![]()
The Bank Withdrawal or Bank Expense form is used to create Payments to Non-Vendors and record Withdrawals directly from your Bank Account. No AP Invoice, AP Credit Memo, or Vendor Record will be associated with the Bank Expense. GL Accounts can be selected to separate and classify the expense amounts. Bank Expenses are one of the several ways to create printable checks using Restaurant365. Click here for more information on Printing Checks
Create a Bank Withdrawal / Bank Expense
Hover over the ‘Banking’ menu in the Top Ribbon and select ‘Withdrawal’. The Bank Expense form will then load in a new tab

Bank Expense Header
![]()
Legend:
1) Checking Account – The Bank Account that will be the source of the funds for the Payment / Expense
2) Number – The next check number for the Bank Account selected in the ‘Checking Account’ field. This field will auto-populate once a Bank Account has been selected
3) Paid To – Ether the payment recipient’s name as it will be printed on the check
4) Location – Select the Location the payment will originate from. This will be the User’s Default Location upon loading the Bank Expense form, but can be adjusted as needed
5) Check Memo – Enter a Check Memo line as it will appear on the printed check
6) Address – Enter the Address of the Paid To value. The value in the Address field will appear on the printed check. Click ‘Change Address’ to open the Change Address prompt where the address can be entered and saved
7) Amount – Enter the total amount of the Payment. The ‘Unassigned Amount’ warning will appear as no Expense Accounts have been assigned yet
8) Amount Text – The Amount Text as it will appear on the printed check. This is generated upon entering a value in the ‘Amount’ field
9) Date – Ensure you have the correct date in the ‘Date’ field.
Bank Expense Details tab
![]()
Legend:
10) Line Account Selector – Select the GL Account where the Expense will be allocated
11) Line Amount – Enter the line item amount for the selected GL Account
12) Line Comment – Enter a line item comment (optional)
13) Line Location Selector – Select the line item Location. Will default to the Location set in the Bank Expense Header
14) Add / Clear buttons – Click ‘Add’ to add the line item to the Details pane. Click ‘Clear’ to clear fields
15) Upload File button – Click ‘Upload File’ to open an Attachment prompt where a file can be uploaded and saved with the Bank Expense
16) Bank Account Balance – This field will display the Bank Account Balance once a ‘Checking Account’ has been selected in the Bank Expense Header
Bank Expense Actions
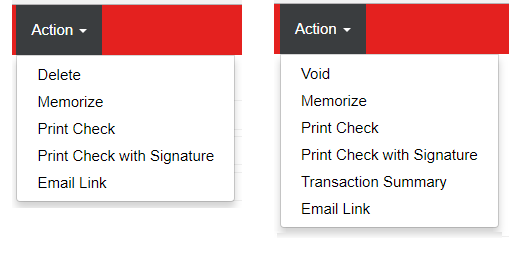
Delete – delete the saved Bank Expense
Void – Void replaces ‘Delete’ on Approved Bank Withdrawal. Voids the Bank Withdrawal. Click here for more information on Voiding
Memorize – create a memorized transaction using the Bank Expense as a template
Print Check – print the Bank Expense Check using the Print Check prompt
Print Check with Signature – this option will appear for Users with ‘Print Check Signature’. Print the check with the Signature uploaded to the Bank Account Record
Transaction Summary – Run a Transaction Summary Report for the Bank Withdrawal
Email Link – send an email with a link from the Bank Expense using Restaurant365. User Email Settings must be configured in order to use this feature