
Overview
The purpose of the Bank Activity screen to make it simple to match your Bank Statement to Transactions that have already been entered in to R365. Bank Activity also allows easy creation of new Deposits and Withdrawals based on data from your Bank. Using the Bank Activity feature will make the Bank Reconciliation process significantly faster. Each transaction that is ‘Matched’ on Bank Activity will be checked off as ‘Reconciled’ on your Bank Rec.
Once your Bank Accounts are setup (click here to learn more about setting up Bank Accounts), then the Bank Activity process consists of 3 steps:
- Download activity from your Bank (.qfx or .qbo file formats only)
- Upload the file on the Bank Activity screen (this will attempt to Auto-match the Bank Transaction with its corresponding R365 Transaction, if it has previously been entered)
- Manually Match / Create / Exclude / Delete entries that do not Auto-match
Important Terminology
These steps will be described in detail below, but first, the bank activity screen consists of 4 tabs and the terminology of those tabs is important so those will be described here first:

- Unmatched – this tab shows all the remaining bank records that did not auto match to existing transactions or match any bank rules you have created.
- Rule Applied – this tab shows all bank records that matched the logic of bank rules you have created. The system tries to match records to bank rules during initial upload of bank activity as well as each time a new rule is created or a rule is modified.
- Matched/Excluded – this tab shows all bank records that have been matched or excluded. Matching means a record downloaded from your bank has a corresponding transaction in the system for the same amount and same bank account. Records are matched and moved to this tab during initial upload of bank activity (the system applies a series of auto-matching logic as described at the bottom of this training article). They can also be matched on the Unmatched tab manually by the user and created as new transactions from the Unmatched tab or the Rule Applied tab. Creating a new transaction on those tabs will also automatically match that record to the transaction and move it to the matched tab. On the Unmatched tab, records can also be Excluded which will move them to this tab. Excluding is described in more detail later in this training. If something is on this tab that should not be matched or excluded then press the button on that row that says Unmatch or Include respectively.
- Bank Rule – this tab shows all bank rules you have previously created. Think of a bank rule as a transaction you want to create the same as a transaction you’ve created on bank activity in the past. For example you can set a rule so any bank record uploaded where the name is “Sprint” should create a transaction for vendor “Sprint Wireless” and post to the “Telephone Expense” account. These rules are on the Bank Rule tab and can be modified and deleted there. This tab is described in more detail further down in the training.
Step 1 – Download activity from your Bank
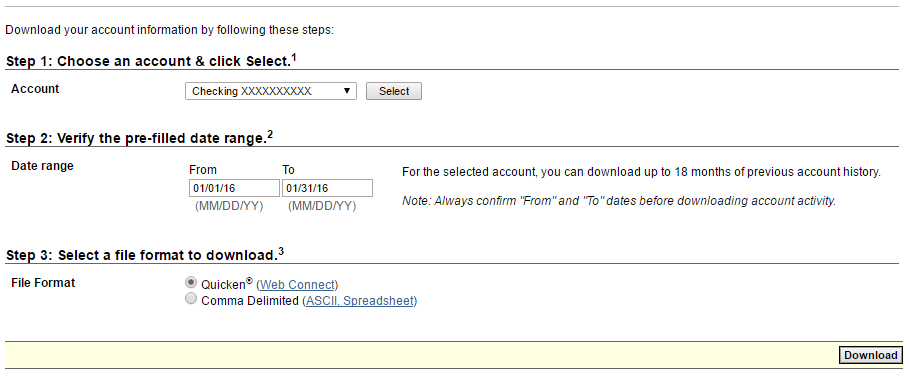
Log into your bank website and choose to download your bank transaction history for your desired Account and date range. You need to download the information into a QFX or QBO file format – typically choosing the QuickBooks or Quicken format option will produce the required QFX or QBO file format.
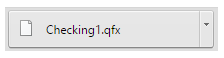
Upon clicking ‘Download’ the file should save to your computer.
If your banking institution does not provide bank activity in the above formats, the CSV (Comma Delimited) file can be obtained and converted to QFX via a third party application. We recommend “csv2qfx Convert” from MoneyThumb. Click here for more information on csv2qfx Convert
Step 2 – Upload the file and automatch
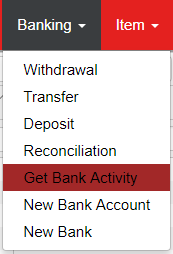
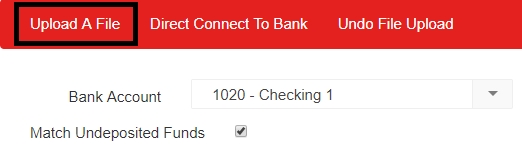
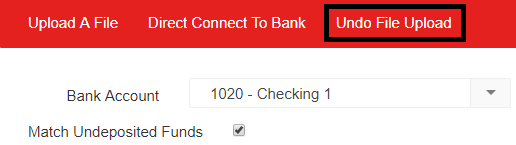
1) Open the Bank Activity window by hovering over the ‘Banking’ and selecting ‘Get Bank Activity’
2) Select your desired bank account in the Bank Accounts selector

3) Check or uncheck the ‘Match Undeposited Funds’ checkbox based on whether you want the system to match these or not.
- If checked then the auto-matching logic will first try to match Transactions in the system for this Bank Account and if it doesn’t find a match it will then try to match this record to transactions in the system that were posted to the Undeposited Funds account. If it does find a match in Undeposited Funds, it will change the Account from ‘Undeposited Funds’ to the Bank Account and then perform the Auto-match. It will not match to Undeposited Funds in a closed period.
- If you don’t want the activity to match to Undeposited Funds, uncheck that box before uploading the file.
4) Click ‘Upload A File’, to open the upload prompt, then click ‘Select Files’ to open the file explorer.
5) Locate the file you downloaded from your Bank and then upload.

6) Once the file has been uploaded, Bank Activity will perform the Auto-matching
- The auto-matching logic will attempt to match each activity record with a Transaction in the system (auto-matching logic is outlined at the end of this article).
- Records that are successfully Auto-matched will be moved to the ‘Matched/Excluded’ tab
- For records that did not Auto-match an existing transaction, one of two things will occur:
- The Auto-match process will attempt to match the Activity against the conditions set on previously created Bank Rules (located on the ‘Bank Rules’ tab). If the Activity meets the conditions, it will be moved to the ‘Rule Applied’ tab.
- If the Activity does not Auto-match and does not meet any Bank Rule conditions, it will remain on the ‘Unmatched’ tab to await processing
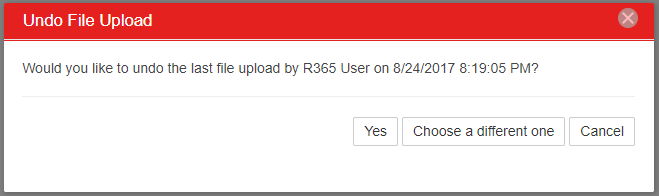
7) Undo File Upload
If a Bank Activity file was uploaded to the wrong Bank Account or otherwise incorrectly uploaded, click ‘Undo File Upload’ to open the Undo File Upload prompt.
The prompt will display the most recently uploaded Bank Activity file and ask if the file should be removed. Click ‘Yes’ to remove the upload, otherwise click ‘Choose a different one’ to review and select a different Upload file.
Step 3 – Manually Match / Create / Exclude / or Delete Activity that didn’t Auto-match
You will spend the majority of your time in Bank Activity on the ‘Unmatched’ tab processing Activity that was unable to be Auto-matched.
Unmatched Tab
Manual Matching
If there is a possible match in the system but the match wasn’t close enough that the system could Auto-match, it will indicate there’s a potential match with an ‘M’ on the row in the 9th column (highlighted in red in image below). Reasons for possible matches include:
- There are multiple Transactions in the system for the same amount
- There are multiple Bank Activity records imported with the same amount and only one R365 Transaction for that amount in the system
To see the possible matches, click the arrow on the far left of the row (highlighted in orange in image below) to expand the row and list the potential matches for that record (highlighted in green in image below). Click the Match button on the far right of the row that is the correct match and this record will be matched and moved to the ‘Matched/Excluded’ tab. Collapse the row by clicking the same arrow (highlighted in orange below).

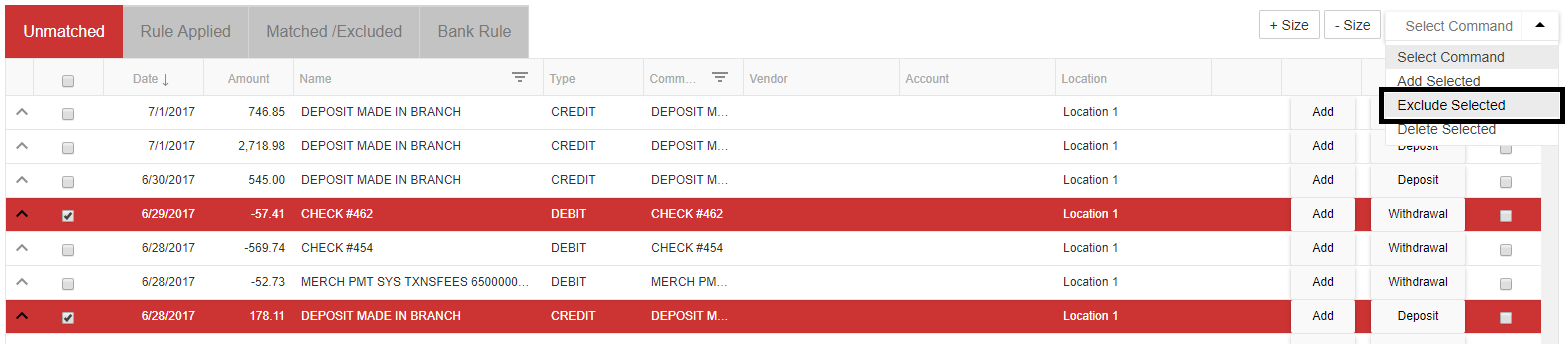
Excluding
It’s possible that you imported some records from your Bank that you didn’t intend to or that you’ve already reconciled manually. You can remove these Activity records from the unmatched tab by selecting each line then in the ‘Select Command’ selector, choosing ‘Exclude Selected’ (red arrow in image below). This will move those rows to the ‘Matched/Excluded’ tab. If you need to move an excluded record back to the ‘Unmatched’ tab from the ‘Matched/Excluded’ tab, simply click the ‘Include’ button on the ‘Matched/Excluded’ tab.
Deleting
If you are confident that the record will not need to be Included or Matched again, you can perform the same process as described in the ‘Excluding’ step above, but instead, select ‘Delete Selected’ to manually delete the Bank Activity records from the ‘Unmatched’ tab

Creating Transactions
You can create Transactions in one of two ways:
1) ‘Simple’ Transactions that only involve:
- One GL Account
- One Location
2) Regular Transactions with multiple Accounts and Locations
‘Simple’ Transaction Steps:
- Populate the Vendor on the Activity row – this field is optional and only applies to Withdrawals (not Deposits).
- If you select a Vendor that has a Default Expense Account, the Account column will populate automatically.
- Set or change the Account on the Activity row – this is required and must be populated on both Withdrawals and Deposits before they can be created.
- Set or change the Location – this will default to the Location on the Bank Account and is a required field.
- Check the ‘Add Rule’ checkbox if you want a Bank Rule created.
- By default ‘Add Rule’ is not checked which means a new Bank Rule will not be created unless you check that box. Checking the box to add the rule will make it so that any other Activity records with this same name will be recommended to hit this same Vendor/Account/Location and be moved to the ‘Rule Applied’ tab.
- Leaving the ‘Add Rule’ box unchecked means that when this transaction is added, no Bank Rule will be created. Refer to the Bank Rules section below for more information.
- Add the Transaction:
- Click the ‘Add’ button on the Activity record row to add the single transaction immediately. If ‘Add Rule’ is checked, this will also create the Bank Rule.
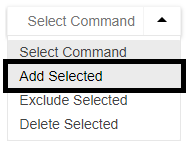
- To add several Transactions at once, complete the required fields, then select each Activity record row. Click on ‘Select Command’ and select ‘Add Selected’. Each Transaction will be added and any rows with ‘Add Rule’ checked will also create new Bank Rules.
![]()
Regular Transaction Steps:
For Transactions that require multiple GL Accounts or Locations, instead of populating the Vendor / Account / Location values on the Activity row, click the ‘Withdrawal’ or ‘Deposit’ button. A Withdrawal or Deposit form will appear in a popup where you can create the Bank Transaction with as much detail as needed. When you have entered all of the details, click ‘Create Withdrawal’ or ‘Create Deposit’ in the upper left corner of the popup to create the Transaction and move the Activity row to the ‘Matched/Excluded’ tab.
Clearing Unmatched Tab
Once you’ve finished creating and matching all the desired Transactions in the ‘Unmatched’ tab, if any Activity records remain, you can remove them by clicking the ‘Remove All Unmatched’ button near the top of the Bank Activity window and all unmatched items will be moved to the ‘Matched/Excluded’ tab that you can then match at a later time.

If you have Bank Rules setup and you’ve uploaded transactions that match those rules, the system will recommend the rules be applied to those records. It will show those records on the ‘Rule Applied’ tab which looks and functions like the ‘Unmatched’ tab. The benefit of this tab is it shows you records matched your existing Bank Rules and it shows what Vendor / Account / Location will be assigned if you choose to add those Transactions.
Review the records on this tab, make changes to the Vendor / Account / Location fields on any row that you’d like to change and then just as on the ‘Unmatched’ tab, you can either add one at a time with the ‘Add’ button on each row, or add in bulk. Adding in bulk is usually best and the quickest way to do it is to click the Select all check box at the top of the far left column (circled in orange in image below) to select all rows and then click Select Command dropdown in the upper right above the grid and select ‘Add Selected’ from the dropdown (red arrow in image). This will create those Transactions and move each selected Activity row to the ‘Matched/Exlcluded’ tab.

- Name – this is the name of the bank rule and can be named whatever will help you know this rule. By default the rule will have the same name as the Name on the bank record used to create this rule, but it can be modified on the Bank Rule tab.
- Type – this defines what type of transaction will get created using this rule (withdrawal or deposit) and will default to the same type as the record used to create the rule.
- Bank Account – this defines which bank accounts this rule applies to. You can either select the word All and it will apply to all bank accounts or select 1 specific bank account. If you want the same rule to apply to multiple bank accounts but not to all then you will need to create that rule for each bank account you wish to apply it to.
- Condition – the selection here will determine how strict of a match the Bank Rule must make to meet the rule conditions. You can choose one of the following conditions:
- Value – this is the value that the Bank Rule will try to match to the Name field on the Activity records. You can simplify the value so instead of an exact name (i.e., ‘Sprint #05918’) it can be a more generic name for matching purposes (i.e., ‘sprint’). With the generic value, the condition can be set to ‘Name Contains’ and then during the Auto-match process, any Activity record that’s name contains the word ‘sprint’ will be moved to the ‘Rule Applied’ tab for further review.
- 2nd Condition – the second Condition allows you to be more specific in your filtering on Bank Rules that are applied during the Auto-match. The same Condition options are available here.
- 2nd Value – the matching value for the second condition. This will typically be more specific as the first Condition was more generic
- Vendor – this is the Vendor that will be automatically added to Bank Withdrawals for records that match this rule
- Account – this is the GL Account that will be automatically added to Withdrawals or Deposits for records that match this rule
- Location – this is the Location that will be automatically added to Withdrawals or Deposits for records that match this rule

Bank rules get created by having the ‘Add Rule’ checkbox checked on an Activity row where you populate the Vendor / Account / Location fields and click ‘Add’ (or bulk add). You can make changes to existing Bank Rules and then click ‘Save changes’ to save any updates. To delete a rule click the trashcan icon on the far right of the row.
Auto-matching Logical Process Flow:
The matching process goes through the following sequence to find matches and potential matches:
- Check number (Number in the Memo Field to the Check Number on the AP Payment record)
- Amounts match and unique (only 1) and Dates match – Mark as Match
- Amounts match and unique (only 1) and with Date Range of -4 days – Mark as Match
- Amounts match and unique (only 1) and with Date Range of -7 days – Mark as Match
- Amounts match and unique (only 1) and with Date Range of +2 days – Mark as Match
- Amounts match and unique (only 1) and with Date Range of all past days – Mark as Match
- Amounts match multiple records – Mark as a potential Match (capital ‘M’ on ‘Unmatched’ tab)
- Repeat from step 1 for all Undeposited Funds Account entries after the most recent Closed Date on the Legal Entity


