Restaurant365 allows users to print their own checks without relying upon pre-printed check stock. This gives users greater flexibility and added security as they will not have to keep pre-printed check stock on premises, or under lock and key. Blank checks also offer additional convenience, allowing you to print multiple checks out of multiple checkbooks in a single check run, with no need to go into the printer and change the checks between changing the checkbook in the system. Click here for training on how to Print Checks
Check Printing Requirements:
To be able to print checks in Restaurant365, you need to purchase the following items, and complete the following setup steps:
Purchase
1) Blank Check Stock – Form 1000 or Check, Stub, Stub from Versacheck
You can order Blank Check Stock from various online retailers or Brick and Mortar office supply stores. Form 1000 can be purchased directly from Versacheck, Amazon, or any other Office retailer.
2) Double Window Check Envelopes (optional) – Self-Sealing Voucher Check Envelope (3-9/16 H x 8-3/4 W) from Versacheck
If you plan on mailing checks to your Vendors, you may consider purchasing double window check envelopes for easy check mailing.
You can order the Self-Sealing Voucher Check Envelope from various online retailers or Brick and Mortar office supply stores. Self-Sealing Voucher Check Envelope can be purchased directly from Versacheck, Amazon, Staples, or any other Office retailer.
3) MICR (Magnetic Character Ink Recognition) Toner for your MICR-capable printer
Some banks require MICR ink be used when printing checks. As this is not a universal requirement in the digital banking age, it is recommended that you contact your bank to inquire if MICR ink is required.
Restaurant365 recommends that if your bank requires the use of MICR ink on issued checks, that your organization purchases a dedicated MICR printer for check printing purposes. Versacheck offers a wide range of MICR printers, as well as MICR toner cartridges for regular printers. Inkcarts also has a wide offering of MICR toner. Additionally these items can be found from various online retailers or Brick and Mortar office supply stores
Setup
4) Set User Security Roles
Refer to the Check Printing User Security Grid for more information on which Security Roles grant access to Printing Checks
5) Set up your Bank Account Info in Restaurant365
In Restaurant365, Bank Accounts reside in the General Ledger as GL Accounts. To classify a GL Account as a Bank Accounts, check the ‘Is Bank Account’ checkbox on the GL Account Record. Click here for more information on GL Account Records and Bank Account Records. To create a new Bank Account, please see the Add a New Bank Account training. To create a new Bank (#3 in the image below), please see the Add a New Bank training.
When a GL Account is identified as a Bank Account, the GL Account will appear in the Bank Accounts List view (located under Banking in the Accounting Module), additionally the GL Account will be made available on the Bank Activity and Bank Reconciliation screens. Click here for more information on Bank Activity, and Bank Reconciliation.
The checkbox highlighted in red below is to specify if the GL Account is a Bank Account (an Account that will be made available in the Bank Accounts List View, as well as the Bank Activity / Reconciliation screens). Note: this checkbox will only appear when a GL Type with the Financial Report setting of ‘Balance Sheet’ is selected in the GL Type selector above (4). If the GL Account is a Profit & Loss Account (and therefor has a GL Type that has the Financial Report setting of ‘Profit & Loss’) this checkbox will not appear. When selected, Bank Account details appear on the GL Account Record.
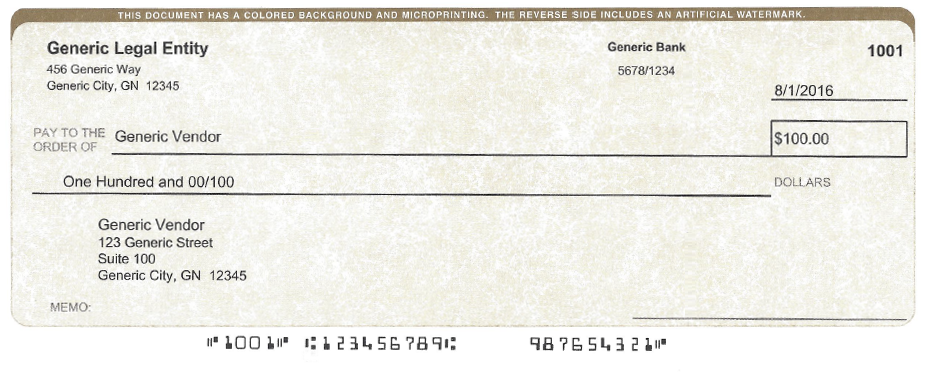
To complete the check printing setup, you need to have your Bank Information properly set up in Restaurant365. Navigate to Accounting>> Bank Accounts >> and find and open the Bank Account from which you will be printing checks. The Bank Account Record will open with the fields shown in the following image. To properly print checks, the Location (1), Bank Name (on Check)(2), Bank (3), Routing Number (6), Bank Account Number (7), and Next Check Number (8) must be completed, and the record saved. Please see the legend below for a description of each field on the Bank Account Record.

Legend:
1) Location – It is assumed that only one Legal Entity controls each cash account so it’s important to select a Location within the Legal Entity for this Bank Account. This field will help drive the intercompany accounts when money is transferred to cash accounts controlled by other Legal Entities
2) Bank Name (on Check) – Name of the Bank that will appear on the printed check
3) Bank – This field will identify the Banking Institution and the type of Bank Account. Click on the selector to choose the appropriate Bank. If the institution isn’t listed, click on the ‘Bank’ text to the left of the field, and a new tab will open where you can create the Banking Institution.
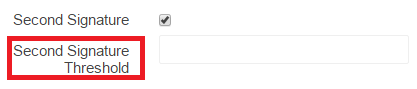
4) Second Signature – Click this box if a second signature is desired on checks from this checkbook. When checked this will show a another field called Second Signature Threshold where you set what dollar value for the check will require the 2nd signature. For example, if checks for $5,000 and above require a 2nd signature then check this box and put 5,000 in the threshold field. If 2nd signature is required on all checks then put $0 in the threshold field. This will make a 2nd signature line print on the check just above the regular signature line. You can still have a signature image print for the first signature if you desire (14), but the 2nd signature must be manually signed
5) Check Format – Select the Check format for this Bank Account. Options include United States, and Canada
6) Routing Number – Enter the Routing Number of the Bank Account
7) Bank Account Number – Enter the Account Number of the Bank Account
8) Next Check Number – Enter the next available check number. This will be used when printing physical checks from this account and will display in the MICR line on the check. It is important that these be exactly the same as given to you by your bank
9) Last Reconciled Date – Date the Account has been reconciled through
10) Last Reconciled Balance – Balance of the Account as of the last reconciliation
11) Last Activity End – The date of the last activity in this Account
12) Is Deposit Only – Check this box if this Account is for Deposits Only and you don’t want it as an option on the Check Run and Manual Payment screens
13) Bank User Name – User name for online banking – This will be used in ’Bank Activity’ if you use the automatic upload option
14) Select Signature Button – Clicking this button will open a prompt where the user can upload a signature file that will print on physical checks when ‘Print Check with Signature’ is selected. Printing checks with signatures requires a separate security role: Print Check Signature. Click here for more information on How to Create a Signature File