GL Accounts can also be classified as Bank Accounts by checking the ‘Is Bank Account’ checkbox on the GL Account Record. Click here for more information on GL Account Records. To create a new Bank Account, please see the Add a New Bank Account training.
When a GL Account is identified as a Bank Account, the GL Account will appear in the Bank Accounts List view (located under Banking in the Accounting Module), additionally the GL Account will be made available on the Bank Activity and Bank Reconciliation screens. Click here for more information on Bank Activity, and Bank Reconciliation.
The checkbox highlighted in red below is to specify if the GL Account is a Bank Account (an Account that will be made available in the Bank Accounts List View, as well as the Bank Activity / Reconciliation screens). Note: this checkbox will only appear when a GL Type with the Financial Report setting of ‘Balance Sheet’ is selected in the GL Type selector above (4). If the GL Account is a Profit & Loss Account (and therefor has a GL Type that has the Financial Report setting of ‘Profit & Loss’) this checkbox will not appear. When selected, Bank Account details appear on the GL Account Record.

Legend:
1) Location – It is assumed that only one Legal Entity controls each cash account so it’s important to select a Location within the Legal Entity for this Bank Account. This field will help drive the intercompany accounts when money is transferred to cash accounts controlled by other Legal Entities
2) Bank Name (on Check) – Name of the Bank that will appear on the printed check
3) Bank – This field will identify the Banking Institution and the type of Bank Account. Click on the selector to choose the appropriate Bank. If the institution isn’t listed, click on the ‘Bank’ text to the left of the field, and a new tab will open where you can create the Banking Institution.
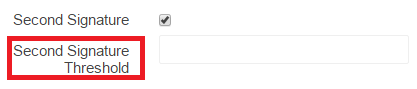
4) Second Signature – Click this box if a second signature is desired on checks from this checkbook. When checked this will show a another field called Second Signature Threshold where you set what dollar value for the check will require the 2nd signature. For example, if checks for $5,000 and above require a 2nd signature then check this box and put 5,000 in the threshold field. If 2nd signature is required on all checks then put $0 in the threshold field. This will make a 2nd signature line print on the check just above the regular signature line. You can still have a signature image print for the first signature if you desire (14), but the 2nd signature must be manually signed
5) Check Format – Select the Check format for this Bank Account. Options include United States, and Canada
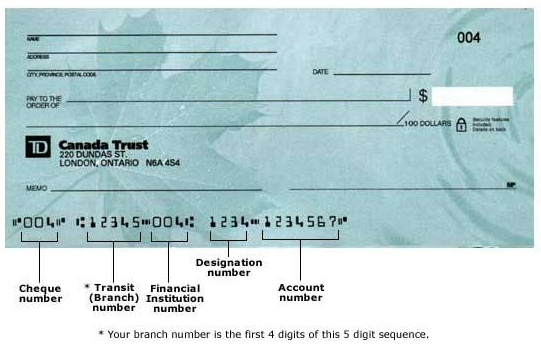
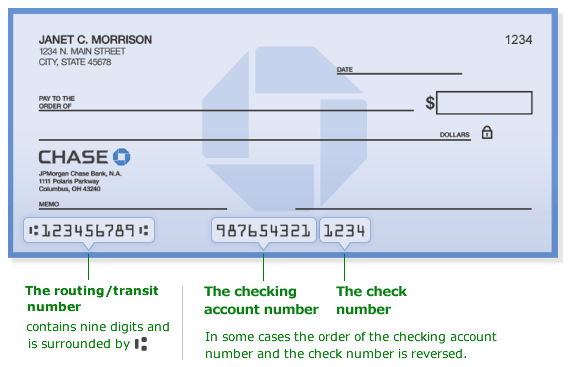
6) Routing Number / Transit Number – Enter the Routing Number (USA) / Transit Number (CAN) of the Bank Account (see below for screenshots depicting US and CAN checks).
Note: For Canadian Transit Numbers with a MICR Dash ( ) present, in the Routing (Transit) Number field, enter a capital ‘D’ in place of the MICR Dash
For example:

7) Bank Account Number – Enter the Account Number of the Bank Account
Note: For Canadian Account Numbers with a MICR Dash () present, in the Account Number field, enter a capital ‘D’ in place of the MICR Dash
For example:

8) Next Check Number – Enter the next available check number. This will be used when printing physical checks from this account and will display in the MICR line on the check. It is important that these be exactly the same as given to you by your bank
9) Last Reconciled Date – Date the Account has been reconciled through
10) Last Reconciled Balance – Balance of the Account as of the last reconciliation
11) Last Activity End – The date of the last activity in this Account
12) Is Deposit Only – Check this box if this Account is for Deposits Only and you don’t want it as an option on the Check Run and Manual Payment screens
13) Bank User Name – User name for online banking – This will be used in ’Bank Activity’ if you use the automatic upload option
14) Select Signature Button – Clicking this button will open a prompt where the user can upload a signature file that will print on physical checks when ‘Print Check with Signature’ is selected. Printing checks with signatures requires a separate security role: Print Check with Signature.
Click the Sample Signature File button below to download a sample signature file that can be used in the creation of signature files for your Bank Accounts:
[easy_media_download url=”http://restaurant365training.com/wp-content/uploads/2016/07/R365_Sample_Signature_1114x137.jpg” text=”Sample Signature File” color=”red_darker” target=”_blank” width=”200″ force_dl=”1″]
Routing Numbers – US Checks
Transit Numbers – Canada Cheques