- Step 1: Make sure to have a copy of your bank statement or online statement ready.
- Step 2: Begin a new reconciliation
- Step 3: Match the transactions in Restaurant365 with the ones one your statement until the indicated difference is 0
- Step 4: Make sure all the voided transactions are cleared from your reconciliation.
- Step 5: Approve and print the reconciliation
Step 1:
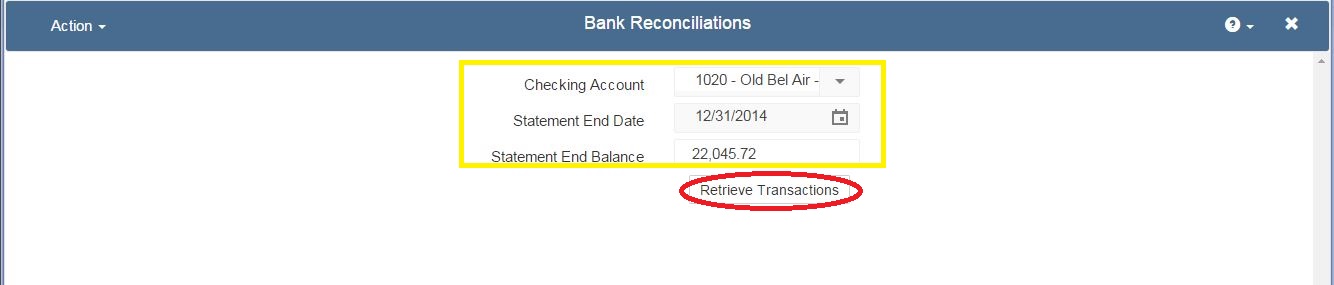
Before beginning your reconciliation, make sure to have a copy of your bank statement or online statement in front of you. To begin reconciling your bank account, click on ‘Reconciliation’ in the Banking section of the ribbon. The New Bank Reconciliation window appears and asks you to select the checking account, statement end date, and statement ending balance. Once those are filled in, hit the ‘Retrieve Transactions’ button. This will retrieve all the transactions for this account up to the statement date you entered.
Once those are filled in, hit the ‘Retrieve Transactions’ button. This will retrieve all the transactions for this account up to the statement date you entered.
![BankRecon1]()
Step 2: Begin a New Reconciliation
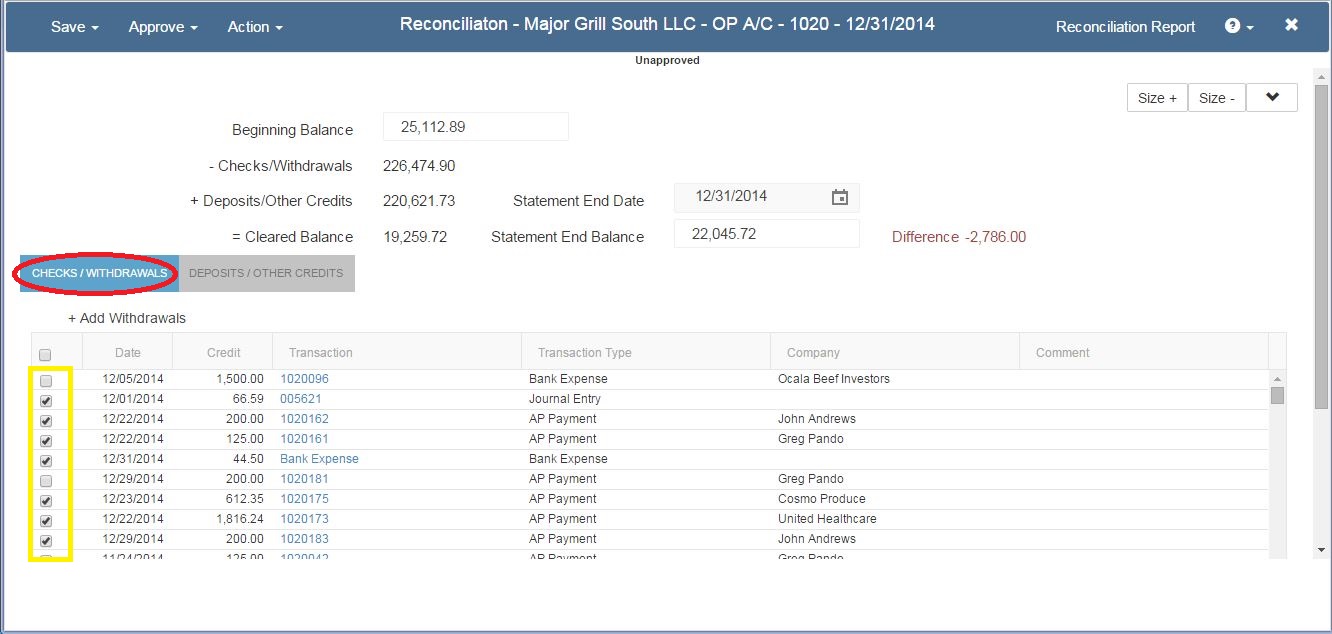
The screen will save and refresh the ‘Name’ of the reconciliation. It is now changed from ‘New’ to: (Checking Account Name) – (Date) – Reconciliation. As always, it begins in an unapproved status.
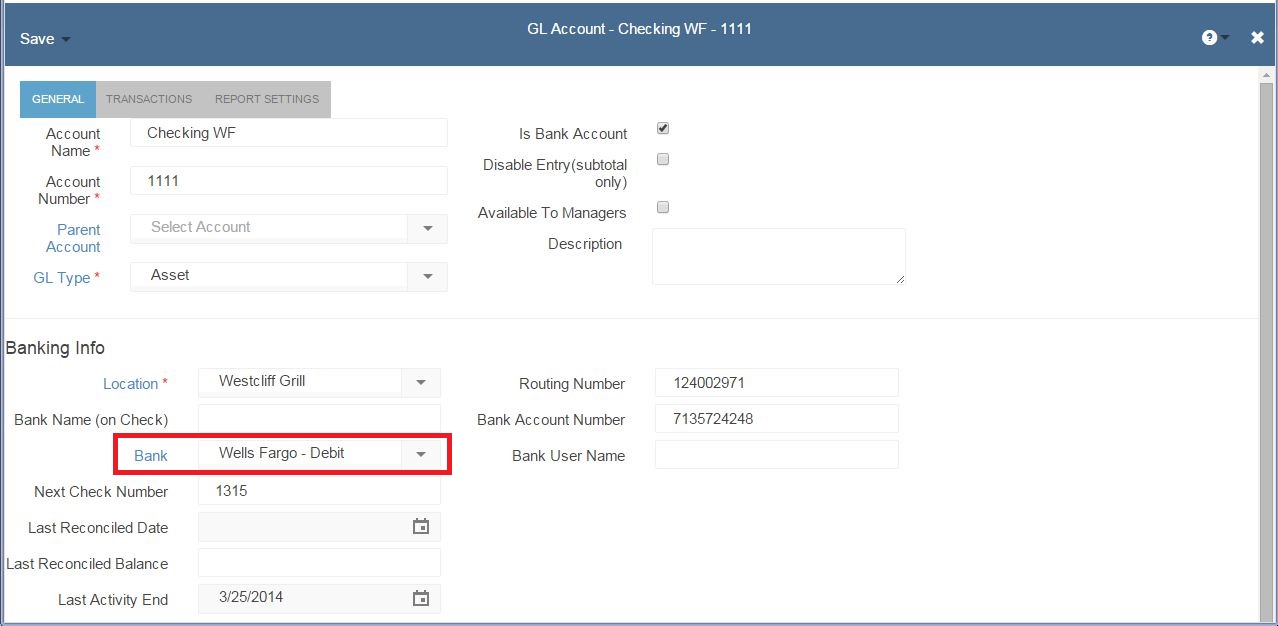
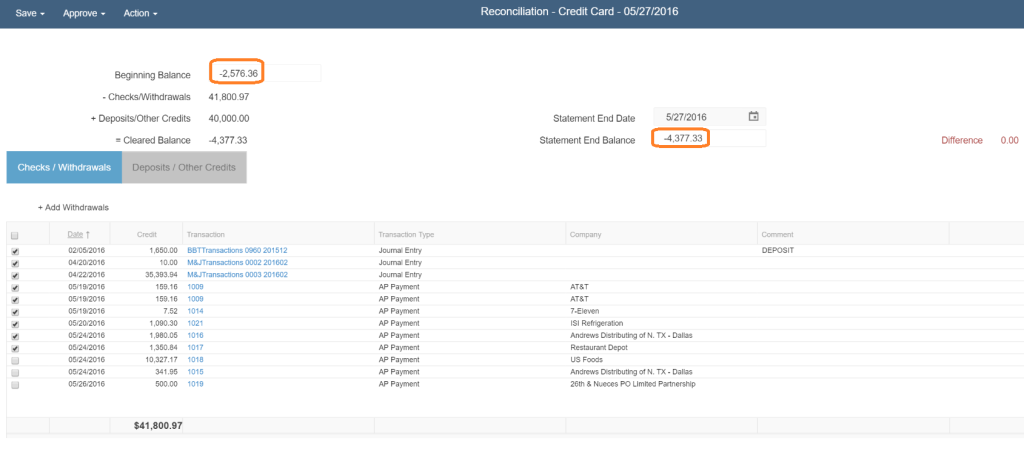
The four fields on the top left are non-editable. The first is the beginning balance which is the last reconciled balance. (If this is the first time reconciling this account, you can add the ‘Beginning Balance’ by entering it on the GL Account record for this checking account. There is a field called ‘Last Reconciled Balance’ in the ‘Banking Info’ section of the GL Account.)
The next three fields (Checks/Other Expenses, Deposits/Other Credits, and Cleared Balance) are all automatically updated as we mark the individual transactions in the grid below. The Statement End Date and Statement End Balance were entered in our first step. Although you would not normally do this, you are able to adjust on the fly the Statement End Balance, in which case the Difference field will automatically recalculate.
![BankRecon2]()
Step 3: Match transactions in R356 with those on your bank statement
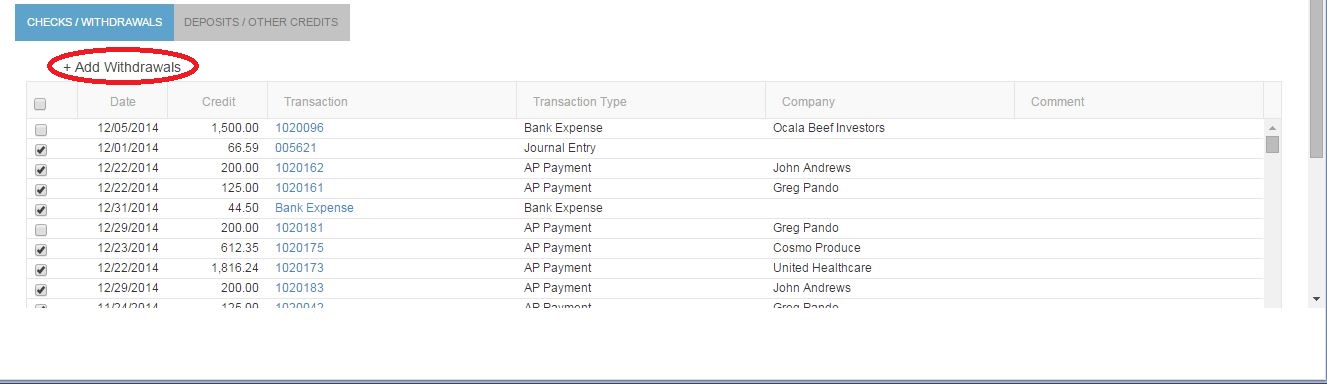
The ‘Checks / Withdrawals’ tab appears first. Click on each individual check or withdrawal as it is shown on your bank statement. You can sort the list by any column or even multiple columns. Clicking once on a column will sort ascending, clicking a 2nd time sorts descending, and clicking a 3rd time turns off sorting on that column.
![BankRecon3]()
If a transaction is matched to bank activity for a date greater than the reconciliation date, it will show in this list with a comment describing which bank activity it is matched to currently. There is an Unmatch button on the row so the user can unmatch that bank activity if it is supposed to be reconciled on this reconciliation instead (image below).
![unmatch]()
You can drill down on any transaction by clicking on the blue colored Number field.
If there is a withdrawal on your bank statement but not in Restaurant365, you can add one quickly on the fly by clicking on the ‘+ Add Withdrawal’ button.
![BankRecon4]()
Upon doing so, the header of the grid expands and allows you to select the account, amount, date, number, description, location, legal entity, and concept that the withdrawal pertains to. Once done, click the ‘Add’ button and the header collapses again and returns you to the previous view.
![BankRecon6]()
After you have added the withdrawal, you will notice that the withdrawal you just added is already marked for reconciliation.
Once done with the checks and withdrawals, click the ‘Deposits / Other Credits’ tab and repeat the same steps taken for clearing the checks and withdrawals. If you need to add a deposit that wasn’t in Restaurant365 previously, click on the ‘+ Add Deposit’ button and follow the same steps. Remember that Legal Entity is a required field. Once you hit add to create the additional deposit, you will be returned to the ‘Deposits / Other Credits’ view and the newly created deposit will be marked for reconciliation.
![BankRecon7]()
During the process of reconciling the Deposits / Other Credits, it is often helpful to keep open the Deposit form (which can be launched from the Top Ribbon by clicking on ‘Banking’ and then ’Deposit’.) This is helpful because if you don’t see a deposit on the Bank Reconciliation but do see it on your bank statement, there is a strong possibility that the receipt of the funds has been recorded in Restaurant365 but simply has not yet been added to a ‘Deposit’ transaction and approved, which will add it to the Bank Reconciliation screen. Keep in mind that if you have the Bank Reconciliation window open, and then you create a new Deposit (and hit Approve & New on the Deposit) it won’t appear on the Bank Reconciliation until click on the ‘Refresh’ button or you close and reopen the Bank Reconciliation form. It’s a good idea to go through and do all of your deposits to match exactly the way they were received by the bank before completing the Bank Reconciliation. It’s the first rule of reconciling a bank statement: enter everything exactly the way it was received by or paid out of the bank. This makes reconciliation a snap later.
If you are using the Bank Activity feature regularly, many of the transaction will already be marked as reconciled by the time you are ready to do a month end reconciliation. See the Bank Activity training video for more details.
Step 4: Make sure all the voided transactions are cleared from your reconciliation.
At this point, we need to pause and insert a comment about clearing voided transactions. If you find a voided transaction on your bank reconciliation (you will know this because the number will end with a ” – V”) it is because someone voided a previously reconciled transaction. This should be very uncommon. If this happens, you will want to clear out the voided transaction on the current bank reconciliation. In order to do this, you will need to offset the void by creating a new Credit or Withdrawal (depending upon the type of voided transaction you see) and mark them both – thus creating a net zero effect to the Ending Balance on the reconciliation. To be more specific, if you see a voided Payment on the Deposits / Other Credits tab, then create a corresponding withdrawal on the ‘Checks / Withdrawals tab. And if you see a voided check on the ‘Checks / Withdrawals’ tab, create an offsetting Credit on the ‘Deposits / Other Credits’ tab. In both cases, make sure to mark both the void and the offset transaction. As for which account to pick on your newly created transaction, you might drill down on the voided transaction to find out the details of the original transaction. In the end, this part is up to you as an accountant! Just remember what is going on, there was a transaction that did in fact clear your bank or was mistakenly marked as reconciled on last month’s reconciliation. Then, that transaction was voided in a subsequent month, and the debits and credits of the original transaction were reversed. Now, that voided transaction must be offset in order for Restaurant365 to match the bank statement this month.
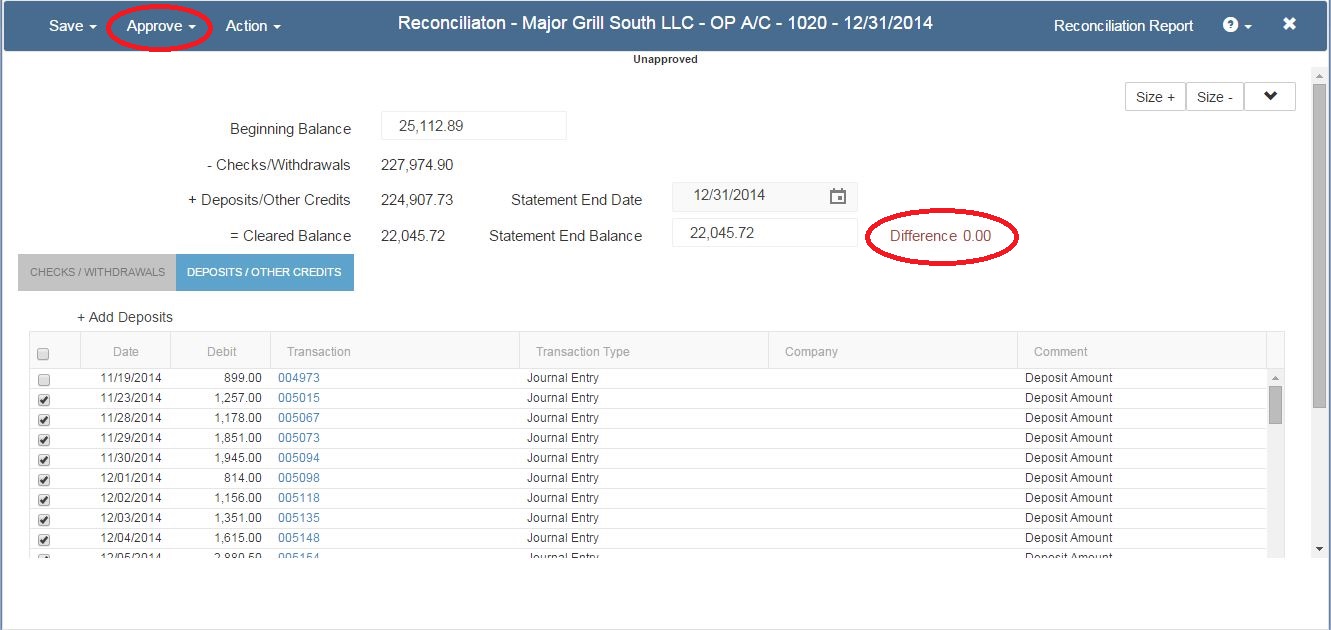
Step 5: Approve and print the reconciliation
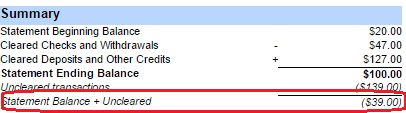
Let’s transition back to the reconciliation. After all the transactions on your bank statement are accounted for, the difference in the header of this reconciliation will be $0.00.
At that point you can Approve the reconciliation or Save it. If you choose to save the reconciliation, you will not be able to start a new one for the same checking account until that one is either or approved or deleted. Only one reconciliation can be in progress for each checking account at a time.
![BankRecon8]()
Keep in mind that when you ‘Approve’ a Bank Reconciliation, you are not approving a transaction but rather indicating that a certain set of transactions (within a given time period), are in sync between your system and the bank. As we pointed out, during the reconciliation process you may add deposits or withdrawals on the fly (which are automatically approved when added). These adjustments can be voided at a later time by opening up those individual transactions. This is unlikely however because by reconciling it, you are indicating that it is a valid adjustment as reported by your bank. You may not, however, void a ‘Reconciliation’. A final note on this topic, when any transaction is included on a bank reconciliation, it can no longer be ‘unapproved.’ Reconciling a transaction locks it down – a powerful control of your cash.
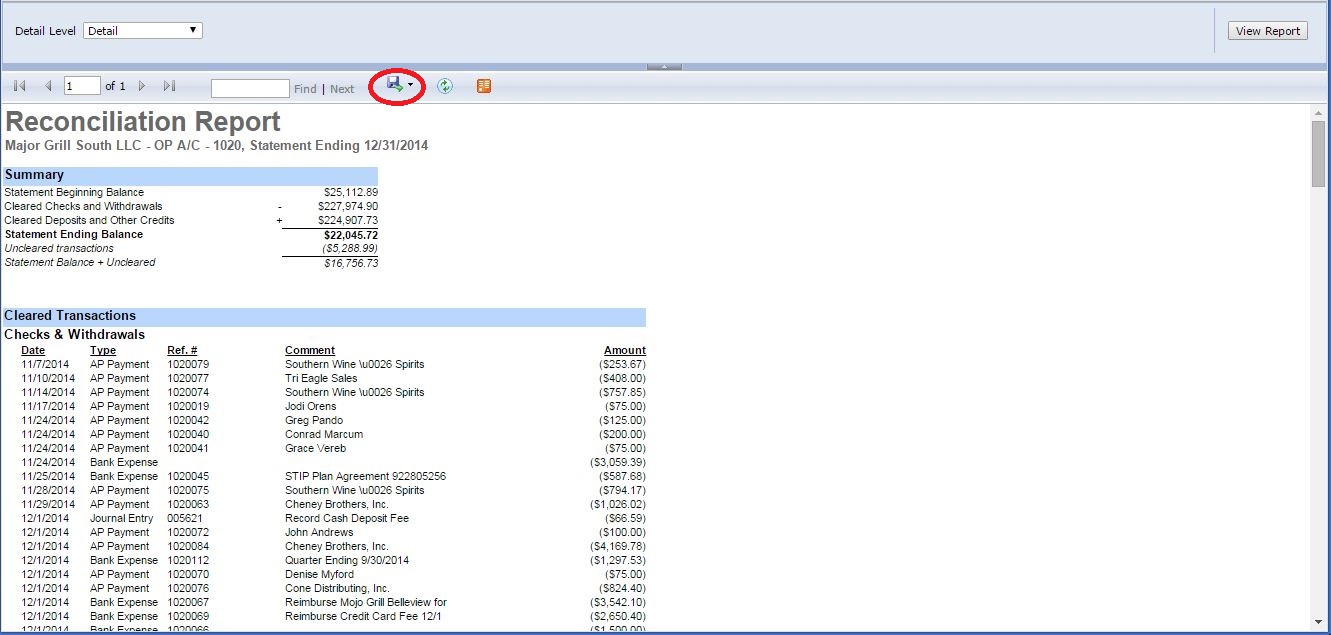
Once you have approved the reconciliation, the ’Reconciliation Report’ button appears in the ribbon. Click this to generate the Reconciliation Report that will display all the cleared transactions along with the beginning and ending account information. You will be able to reprint this at any time.
![BankRecon9]()
Save to PDF to print.
![BankRecon10]() Note: If a change is made to any transaction included on the reconciliation after reconciling, the report will not reflect that change. Once a transaction is reconciled, it is highly unlikely the transaction would need to be modified. Restaurant365 places a visual cue on each transaction that is cleared on a bank reconciliation. The visual cue is the appearance of two fields at the bottom of each transaction. One showing the date of the reconciliation and the second is a link to the actual reconciliation itself. This is helpful to know if you ever are trying to make a change to a transaction and are unsure if it has already been cleared by and reconciled to the bank.Additional Tips:We’ve included a description of how the system handles voiding associated with bank reconciliation for future reference. There are 3 scenarios:
Note: If a change is made to any transaction included on the reconciliation after reconciling, the report will not reflect that change. Once a transaction is reconciled, it is highly unlikely the transaction would need to be modified. Restaurant365 places a visual cue on each transaction that is cleared on a bank reconciliation. The visual cue is the appearance of two fields at the bottom of each transaction. One showing the date of the reconciliation and the second is a link to the actual reconciliation itself. This is helpful to know if you ever are trying to make a change to a transaction and are unsure if it has already been cleared by and reconciled to the bank.Additional Tips:We’ve included a description of how the system handles voiding associated with bank reconciliation for future reference. There are 3 scenarios:
- Voided before it clears the bank – nothing will show up on bank rec because its cancelled
- Clears bank (meaning vendor cashed it) and user has already reconciled it – The reversing/voiding side of the entry will then show up on bank rec because voiding something that already cleared the bank would require some sort of communication with your bank to get credited for something that already cleared. If they are crediting you then this reversing/voiding side of the entry would balance with that bank credit. If the original cleared the bank and the bank is not crediting you for it now, then you probably don’t want to void it.
- Original transaction was made by mistake but the user checked it off on bank rec even though it didn’t match to a transaction on the bank statement – That would probably keep the bank rec from balancing to $0 so then the user might make an adjusting entry on that bank rec to get it to balance. If that happened and then the user later wanted to void the original transaction, they would want to void the adjusting entry they made as well.
That covers the basics of ‘Bank Reconciliation’. Thank you for attending this training session. This article is one of many training sessions available to you on-demand. We invite you to continue your training so that you can get the most out of Restaurant365 to help your restaurant reach it’s full potential.