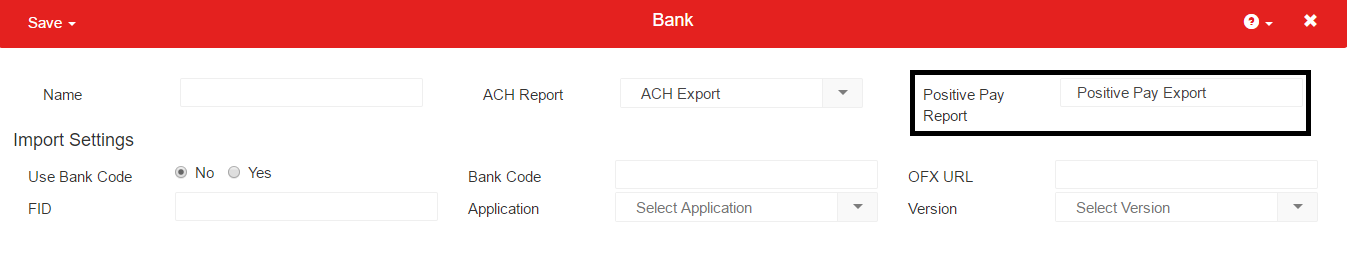
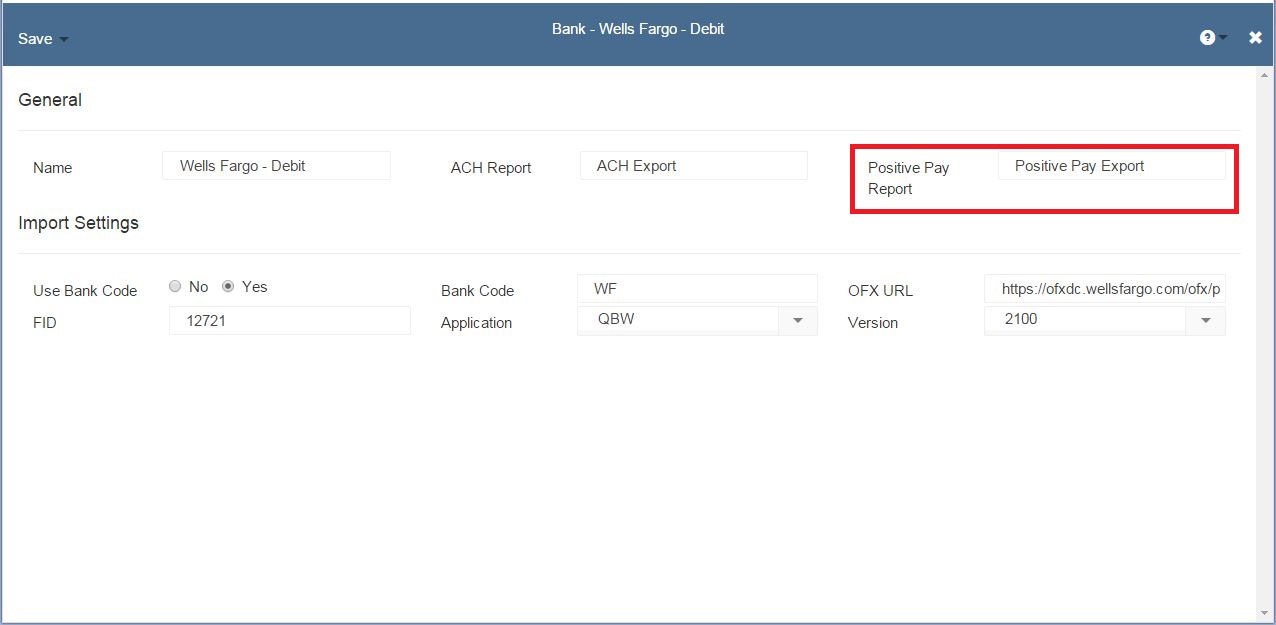
Positive Pay Exports can be produced on the Check Run. In order to produce the Positive Pay Export file, the Positive Pay Report must first be assigned on the Bank Record. Click here for information on ACH Reports
Type in the name of the Positive Pay Report in to the Positive Pay Report field
In the following table are the current Positive Pay Report names, along with a sample export file for each Report. Each of these output files were produced on 10/14/16 using the following sample data:
Vendor Name: Generic Vendor
Payment Date: 10/14/16
Checking Account: 1015 – Checking 1
Location:Generic Location
Next Check Number:3029
Total Check Run (1 check): $600.00
Vendor Bank Account / Routing Numbers:123456789 / 987654321
The positive pay feature (sometimes referred to as safe pay) allows the user to export a list of checks from R365 in a format to be uploaded to the bank. The purpose of the upload is to alert the bank of these checks so they can be cashed. This is a service offered by many banks to ensure that only approved checks can be cashed.
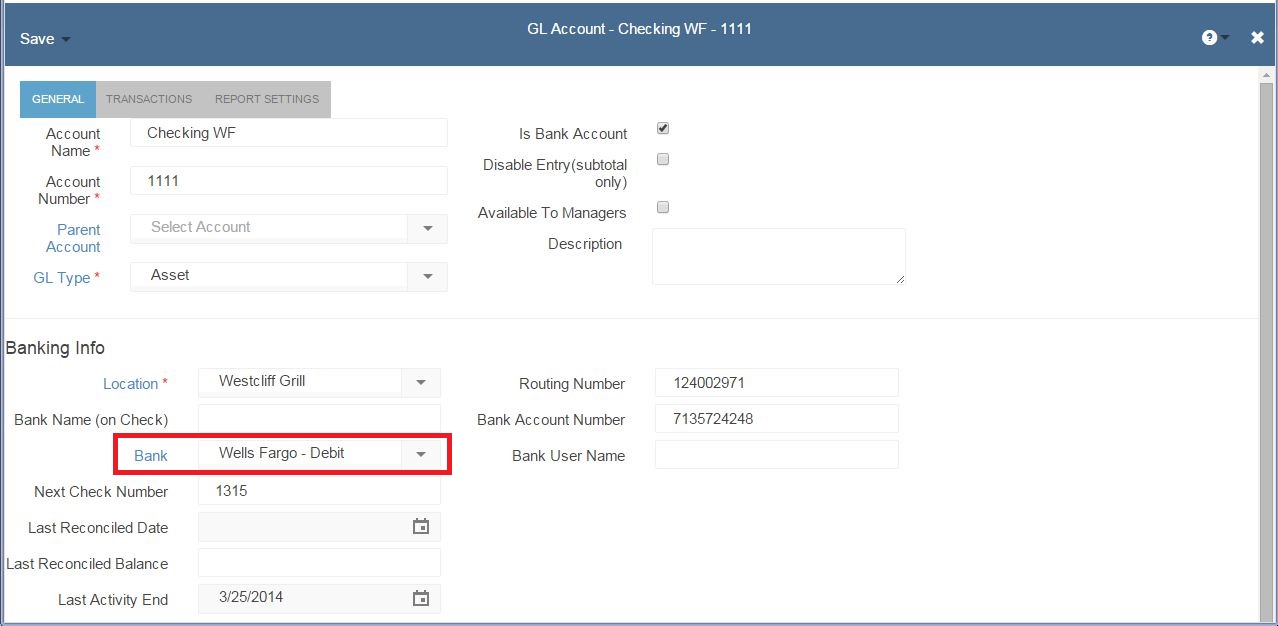
Setup: The positive pay export format is set on the Bank record. Access the bank record by opening the bank account that will use positive pay (left hand side navigation pane: Accounting – Bank Accounts under the Banking sub header). Click on the blue underlined value in the Bank field to open the bank.Image may be NSFW. Clik here to view.On the bank form, set the Positive Pay Report field with the name of the positive pay format for your bank and Save & Close. If unsure of the format name, contact R365 support to get the name.Image may be NSFW. Clik here to view.Steps Positive pay export is accessible for checks created using the check run feature only. It is accessible during the check run and can also be accessed after closing the check run. Do the following to access Positive Pay during the check run. After creating the checks a screen will pop up with a button titled Positive Pay Export, click this button to run the positive pay export report. Save this file to a desired location on your machine and then login to your bank’s website and upload that file. If you wish to review the file after saving do not use excel to open. Instead right click on the file and select ‘Open With Notepad’. To access Positive Pay after the check run is closed, go to Accounting – Reports in left hand navigation pane and find the report named Positive Pay Export in the Banking section. Select the checkbook which will populate the dropdown list of available check runs. Select the desired check run you wish to export positive pay for and then click Run. Save the file as .csv format to a desired location on your machine and then login to your bank’s website and upload that file. That covers Positive Pay.Thank you for attending this training session. This article is one of many training sessions available to you on-demand. We invite you to continue your training so that you can get the most out of Restaurant365 to help your restaurant reach it’s full potential.
Note: Although most Banks allow for ACH upload, please double-check to ensure your account type within your Bank allows for ACH uploading. Restaurant365 recommends sending your Bank Representative a sample of the following available ACH Report Types. The ‘ACH Export Default 1’ report is the National standard used by most Banks.
In the following table are the current ACH Report names, along with a sample export file for each Report. Each of these output files were produced on 10/14/16 using the following sample data:
Vendor Name: Generic Vendor
Payment Date: 10/14/16
Checking Account: 1015 – Checking 1
Location:Generic Location
Next Check Number:3029
Total Check Run (1 check): $600.00
Vendor Bank Account / Routing Numbers:123456789 / 987654321
The purpose of the Bank Activity screen to make it simple to match your Bank Statement to Transactions that have already been entered in to R365. Bank Activity also allows easy creation of new Deposits and Withdrawals based on data from your Bank. Using the Bank Activity feature will make the Bank Reconciliation process significantly faster. Each transaction that is ‘Matched’ on Bank Activity will be checked off as ‘Reconciled’ on your Bank Rec.
Once your Bank Accounts are setup (click here to learn more about setting up Bank Accounts), then the Bank Activity process consists of 3 steps:
Download activity from your Bank (.qfx or .qbo file formats only)
Upload the file on the Bank Activity screen (this will attempt to Auto-match the Bank Transaction with its corresponding R365 Transaction, if it has previously been entered)
Manually Match / Create / Exclude / Delete entries that do not Auto-match
Important Terminology
These steps will be described in detail below, but first, the bank activity screen consists of 4 tabs and the terminology of those tabs is important so those will be described here first:
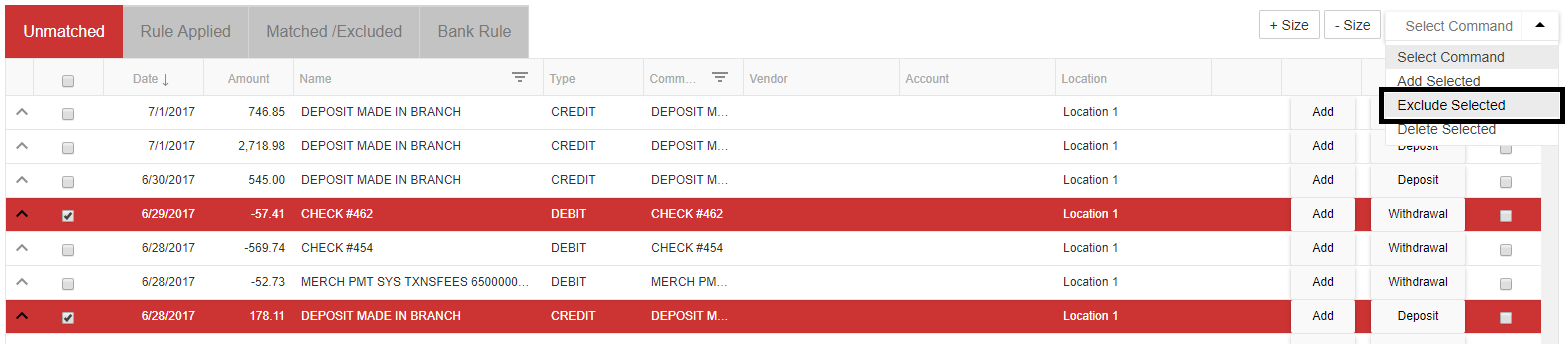
Unmatched – this tab shows all the remaining bank records that did not auto match to existing transactions or match any bank rules you have created.
Rule Applied – this tab shows all bank records that matched the logic of bank rules you have created. The system tries to match records to bank rules during initial upload of bank activity as well as each time a new rule is created or a rule is modified.
Matched/Excluded – this tab shows all bank records that have been matched or excluded. Matching means a record downloaded from your bank has a corresponding transaction in the system for the same amount and same bank account. Records are matched and moved to this tab during initial upload of bank activity (the system applies a series of auto-matching logic as described at the bottom of this training article). They can also be matched on the Unmatched tab manually by the user and created as new transactions from the Unmatched tab or the Rule Applied tab. Creating a new transaction on those tabs will also automatically match that record to the transaction and move it to the matched tab. On the Unmatched tab, records can also be Excluded which will move them to this tab. Excluding is described in more detail later in this training. If something is on this tab that should not be matched or excluded then press the button on that row that says Unmatch or Include respectively.
Bank Rule – this tab shows all bank rules you have previously created. Think of a bank rule as a transaction you want to create the same as a transaction you’ve created on bank activity in the past. For example you can set a rule so any bank record uploaded where the name is “Sprint” should create a transaction for vendor “Sprint Wireless” and post to the “Telephone Expense” account. These rules are on the Bank Rule tab and can be modified and deleted there. This tab is described in more detail further down in the training.
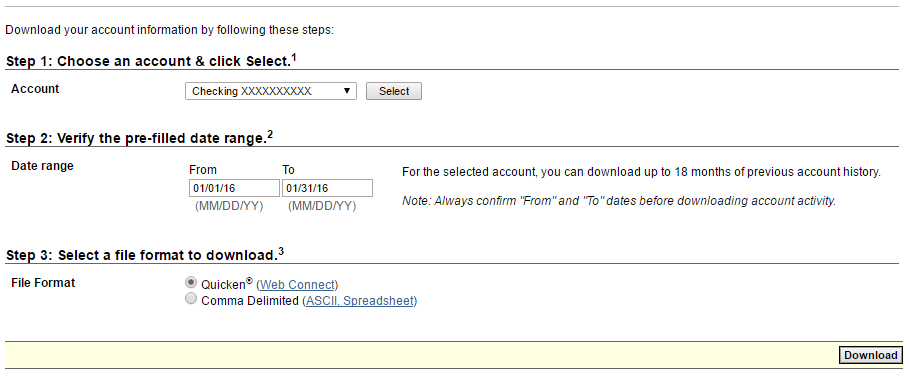
Step 1 – Download activity from your Bank
Image may be NSFW. Clik here to view.
Log into your bank website and choose to download your bank transaction history for your desired Account and date range. You need to download the information into a QFX or QBO file format – typically choosing the QuickBooks or Quicken format option will produce the required QFX or QBO file format.
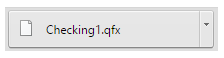
Upon clicking ‘Download’ the file should save to your computer.
If your banking institution does not provide bank activity in the above formats, the CSV (Comma Delimited) file can be obtained and converted to QFX via a third party application. We recommend “csv2qfx Convert” from MoneyThumb. Click here for more information on csv2qfx Convert
Step 2 – Upload the file and automatch
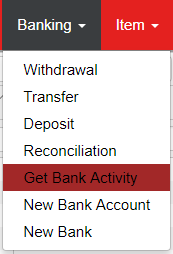
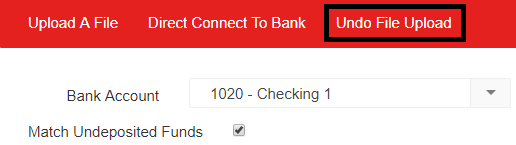
1) Open the Bank Activity window by hovering over the ‘Banking’ and selecting ‘Get Bank Activity’
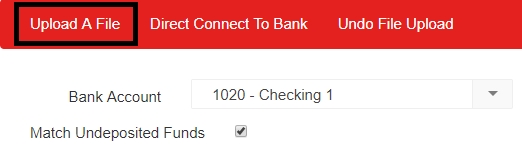
3) Check or uncheck the ‘Match Undeposited Funds’ checkbox based on whether you want the system to match these or not.
If checked then the auto-matching logic will first try to match Transactions in the system for this Bank Account and if it doesn’t find a match it will then try to match this record to transactions in the system that were posted to the Undeposited Funds account. If it does find a match in Undeposited Funds, it will change the Account from ‘Undeposited Funds’ to the Bank Account and then perform the Auto-match. It will not match to Undeposited Funds in a closed period.
If you don’t want the activity to match to Undeposited Funds, uncheck that box before uploading the file.
4) Click ‘Upload A File’, to open the upload prompt, then click ‘Select Files’ to open the file explorer.
6) Once the file has been uploaded, Bank Activity will perform the Auto-matching
The auto-matching logic will attempt to match each activity record with a Transaction in the system (auto-matching logic is outlined at the end of this article).
Records that are successfully Auto-matched will be moved to the ‘Matched/Excluded’ tab
For records that did not Auto-match an existing transaction, one of two things will occur:
The Auto-match process will attempt to match the Activity against the conditions set on previously created Bank Rules (located on the ‘Bank Rules’ tab). If the Activity meets the conditions, it will be moved to the ‘Rule Applied’ tab.
If the Activity does not Auto-match and does not meet any Bank Rule conditions, it will remain on the ‘Unmatched’ tab to await processing
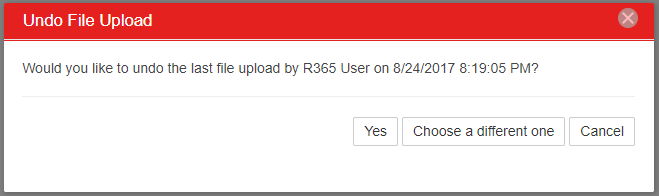
7) Undo File Upload
If a Bank Activity file was uploaded to the wrong Bank Account or otherwise incorrectly uploaded, click ‘Undo File Upload’ to open the Undo File Upload prompt.
The prompt will display the most recently uploaded Bank Activity file and ask if the file should be removed. Click ‘Yes’ to remove the upload, otherwise click ‘Choose a different one’ to review and select a different Upload file.
Step 3 – Manually Match / Create / Exclude / or Delete Activity that didn’t Auto-match
You will spend the majority of your time in Bank Activity on the ‘Unmatched’ tab processing Activity that was unable to be Auto-matched.
Unmatched Tab
Manual Matching
If there is a possible match in the system but the match wasn’t close enough that the system could Auto-match, it will indicate there’s a potential match with an ‘M’ on the row in the 9th column (highlighted in red in image below). Reasons for possible matches include:
There are multiple Transactions in the system for the same amount
There are multiple Bank Activity records imported with the same amount and only one R365 Transaction for that amount in the system
To see the possible matches, click the arrow on the far left of the row (highlighted in orange in image below) to expand the row and list the potential matches for that record (highlighted in green in image below). Click the Match button on the far right of the row that is the correct match and this record will be matched and moved to the ‘Matched/Excluded’ tab. Collapse the row by clicking the same arrow (highlighted in orange below).
It’s possible that you imported some records from your Bank that you didn’t intend to or that you’ve already reconciled manually. You can remove these Activity records from the unmatched tab by selecting each line then in the ‘Select Command’ selector, choosing ‘Exclude Selected’ (red arrow in image below). This will move those rows to the ‘Matched/Excluded’ tab. If you need to move an excluded record back to the ‘Unmatched’ tab from the ‘Matched/Excluded’ tab, simply click the ‘Include’ button on the ‘Matched/Excluded’ tab.
If you are confident that the record will not need to be Included or Matched again, you can perform the same process as described in the ‘Excluding’ step above, but instead, select ‘Delete Selected’ to manually delete the Bank Activity records from the ‘Unmatched’ tab
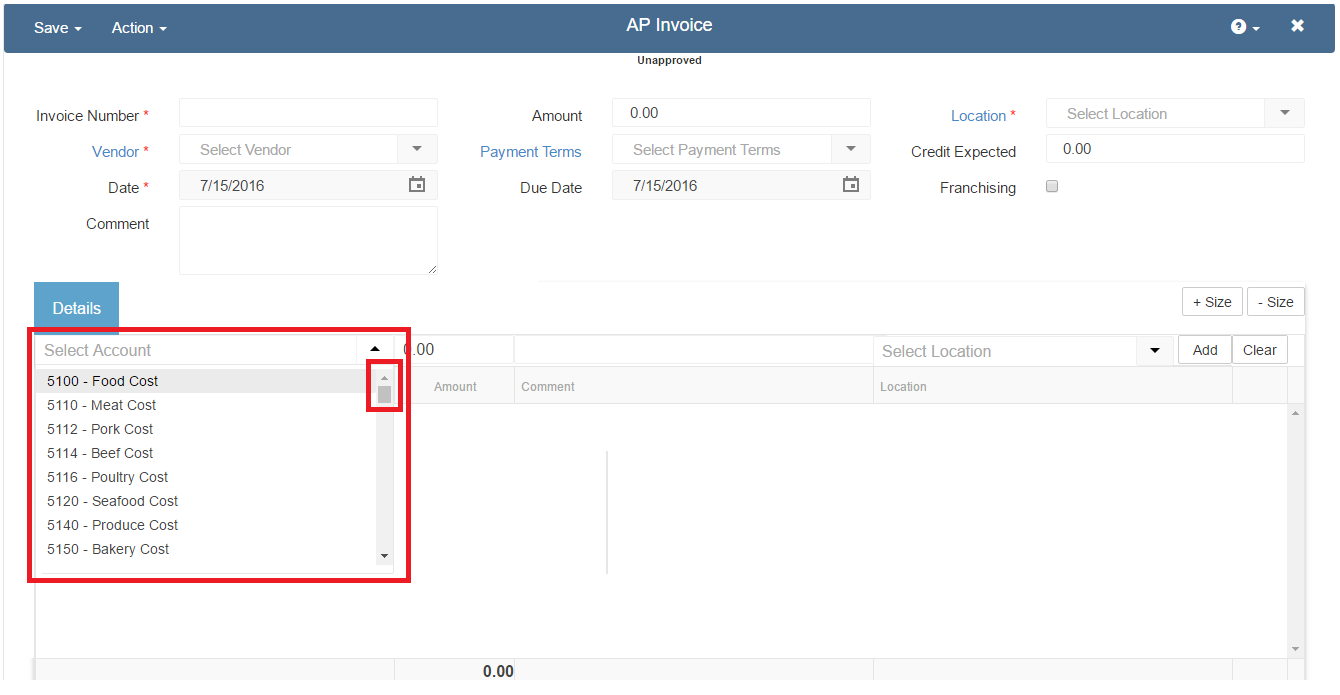
2) Regular Transactions with multiple Accounts and Locations
‘Simple’ Transaction Steps:
Populate the Vendor on the Activity row – this field is optional and only applies to Withdrawals (not Deposits).
If you select a Vendor that has a Default Expense Account, the Account column will populate automatically.
Set or change the Account on the Activity row – this is required and must be populated on both Withdrawals and Deposits before they can be created.
Set or change the Location – this will default to the Location on the Bank Account and is a required field.
Check the ‘Add Rule’ checkbox if you want a Bank Rule created.
By default ‘Add Rule’ is not checked which means a new Bank Rule will not be created unless you check that box. Checking the box to add the rule will make it so that any other Activity records with this same name will be recommended to hit this same Vendor/Account/Location and be moved to the ‘Rule Applied’ tab.
Leaving the ‘Add Rule’ box unchecked means that when this transaction is added, no Bank Rule will be created. Refer to the Bank Rules section below for more information.
Add the Transaction:
Click the ‘Add’ button on the Activity record row to add the single transaction immediately. If ‘Add Rule’ is checked, this will also create the Bank Rule.
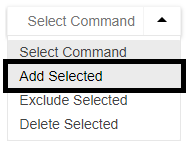
To add several Transactions at once, complete the required fields, then select each Activity record row. Click on ‘Select Command’ and select ‘Add Selected’. Each Transaction will be added and any rows with ‘Add Rule’ checked will also create new Bank Rules.
For Transactions that require multiple GL Accounts or Locations, instead of populating the Vendor / Account / Location values on the Activity row, click the ‘Withdrawal’ or ‘Deposit’ button. A Withdrawal or Deposit form will appear in a popup where you can create the Bank Transaction with as much detail as needed. When you have entered all of the details, click ‘Create Withdrawal’ or ‘Create Deposit’ in the upper left corner of the popup to create the Transaction and move the Activity row to the ‘Matched/Excluded’ tab.
Clearing Unmatched Tab
Once you’ve finished creating and matching all the desired Transactions in the ‘Unmatched’ tab, if any Activity records remain, you can remove them by clicking the ‘Remove All Unmatched’ button near the top of the Bank Activity window and all unmatched items will be moved to the ‘Matched/Excluded’ tab that you can then match at a later time.
If you have Bank Rules setup and you’ve uploaded transactions that match those rules, the system will recommend the rules be applied to those records. It will show those records on the ‘Rule Applied’ tab which looks and functions like the ‘Unmatched’ tab. The benefit of this tab is it shows you records matched your existing Bank Rules and it shows what Vendor / Account / Location will be assigned if you choose to add those Transactions.
Review the records on this tab, make changes to the Vendor / Account / Location fields on any row that you’d like to change and then just as on the ‘Unmatched’ tab, you can either add one at a time with the ‘Add’ button on each row, or add in bulk. Adding in bulk is usually best and the quickest way to do it is to click the Select all check box at the top of the far left column (circled in orange in image below) to select all rows and then click Select Command dropdown in the upper right above the grid and select ‘Add Selected’ from the dropdown (red arrow in image). This will create those Transactions and move each selected Activity row to the ‘Matched/Exlcluded’ tab.
Bank Rule TabImage may be NSFW. Clik here to view.This tab is where you manage your Bank Rules. Bank Rules are used so the system can attempt to assign a Vendor / Account / Location to the Activity records you import based on set conditions. Bank Rule fields are shown in the screenshot below and are defined as follows:
Name – this is the name of the bank rule and can be named whatever will help you know this rule. By default the rule will have the same name as the Name on the bank record used to create this rule, but it can be modified on the Bank Rule tab.
Type – this defines what type of transaction will get created using this rule (withdrawal or deposit) and will default to the same type as the record used to create the rule.
Bank Account – this defines which bank accounts this rule applies to. You can either select the word All and it will apply to all bank accounts or select 1 specific bank account. If you want the same rule to apply to multiple bank accounts but not to all then you will need to create that rule for each bank account you wish to apply it to.
Condition – the selection here will determine how strict of a match the Bank Rule must make to meet the rule conditions. You can choose one of the following conditions:
Value – this is the value that the Bank Rule will try to match to the Name field on the Activity records. You can simplify the value so instead of an exact name (i.e., ‘Sprint #05918’) it can be a more generic name for matching purposes (i.e., ‘sprint’). With the generic value, the condition can be set to ‘Name Contains’ and then during the Auto-match process, any Activity record that’s name contains the word ‘sprint’ will be moved to the ‘Rule Applied’ tab for further review.
2nd Condition – the second Condition allows you to be more specific in your filtering on Bank Rules that are applied during the Auto-match. The same Condition options are available here.
2nd Value – the matching value for the second condition. This will typically be more specific as the first Condition was more generic
Vendor – this is the Vendor that will be automatically added to Bank Withdrawals for records that match this rule
Account – this is the GL Account that will be automatically added to Withdrawals or Deposits for records that match this rule
Location – this is the Location that will be automatically added to Withdrawals or Deposits for records that match this rule
Bank rules get created by having the ‘Add Rule’ checkbox checked on an Activity row where you populate the Vendor / Account / Location fields and click ‘Add’ (or bulk add). You can make changes to existing Bank Rules and then click ‘Save changes’ to save any updates. To delete a rule click the trashcan icon on the far right of the row.
Auto-matching Logical Process Flow:
The matching process goes through the following sequence to find matches and potential matches:
Check number (Number in the Memo Field to the Check Number on the AP Payment record)
Amounts match and unique (only 1) and Dates match – Mark as Match
Amounts match and unique (only 1) and with Date Range of -4 days – Mark as Match
Amounts match and unique (only 1) and with Date Range of -7 days – Mark as Match
Amounts match and unique (only 1) and with Date Range of +2 days – Mark as Match
Amounts match and unique (only 1) and with Date Range of all past days – Mark as Match
Amounts match multiple records – Mark as a potential Match (capital ‘M’ on ‘Unmatched’ tab)
Repeat from step 1 for all Undeposited Funds Account entries after the most recent Closed Date on the Legal Entity
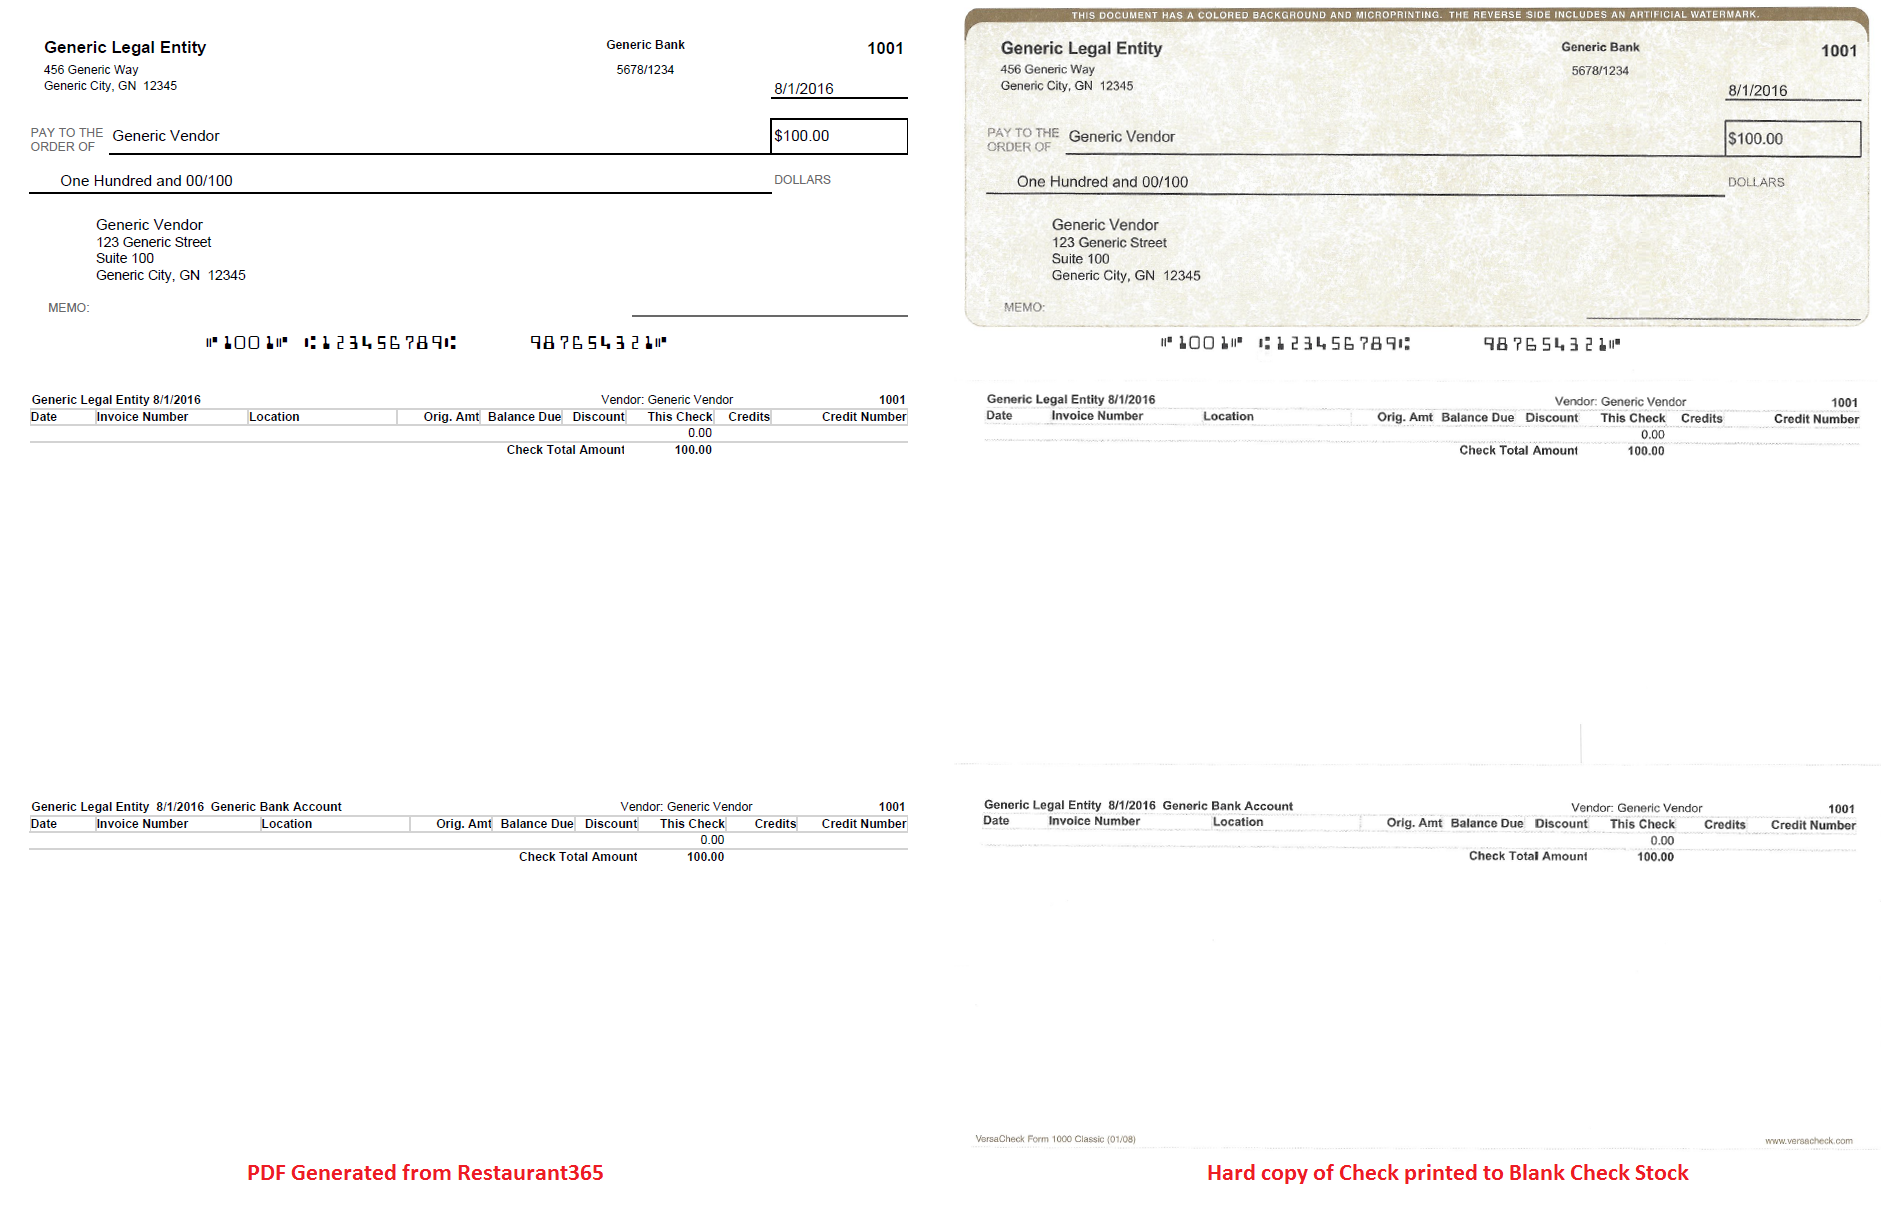
Restaurant365 allows users to print their own checks without relying upon pre-printed check stock. This gives users greater flexibility and added security as they will not have to keep pre-printed check stock on premises, or under lock and key. Blank checks also offer additional convenience, allowing you to print multiple checks to multiple Vendors in a single check run. The blank check stock can be used for multiple checkbooks and multiple Check Runs all without the need to change the check stock in the printer.
Before you can print checks using Restaurant365, Bank Accounts must be setup correctly, and the required check stock, MICR toner/printers must be purchased. For details on how to prepare for check printing, please see the following trainings: USA Check Printing Setup, Canada Check Printing Setup
To be able to print checks in Restaurant365 without the assistance of another user with a higher security role, a User must have the Accounting Manager security role. Accounting Clerks can print checks from AP Payments that have previously been approved, and Accounting Clerks and Restaurant Managers with the additional security role of Pay AP Invoice, can approve and print checks. Please refer to the Security Grid below for a listing of the 3 Primary Roles (in dark blue) and their respective Secondary Roles that grant users access to print checks in Restaurant365:
You will need a printer that supports borderless printing to properly print checks in Restaurant365. Borderless printing means that you have the ability to print any PDF file without margins. This feature is common among printers and printing software. Google Chrome, the preferred browser of Restaurant365, also supports borderless printing from the Google Chrome Print prompt. Ensure the proper settings are in place to print checks:
Google Chrome Print Prompt
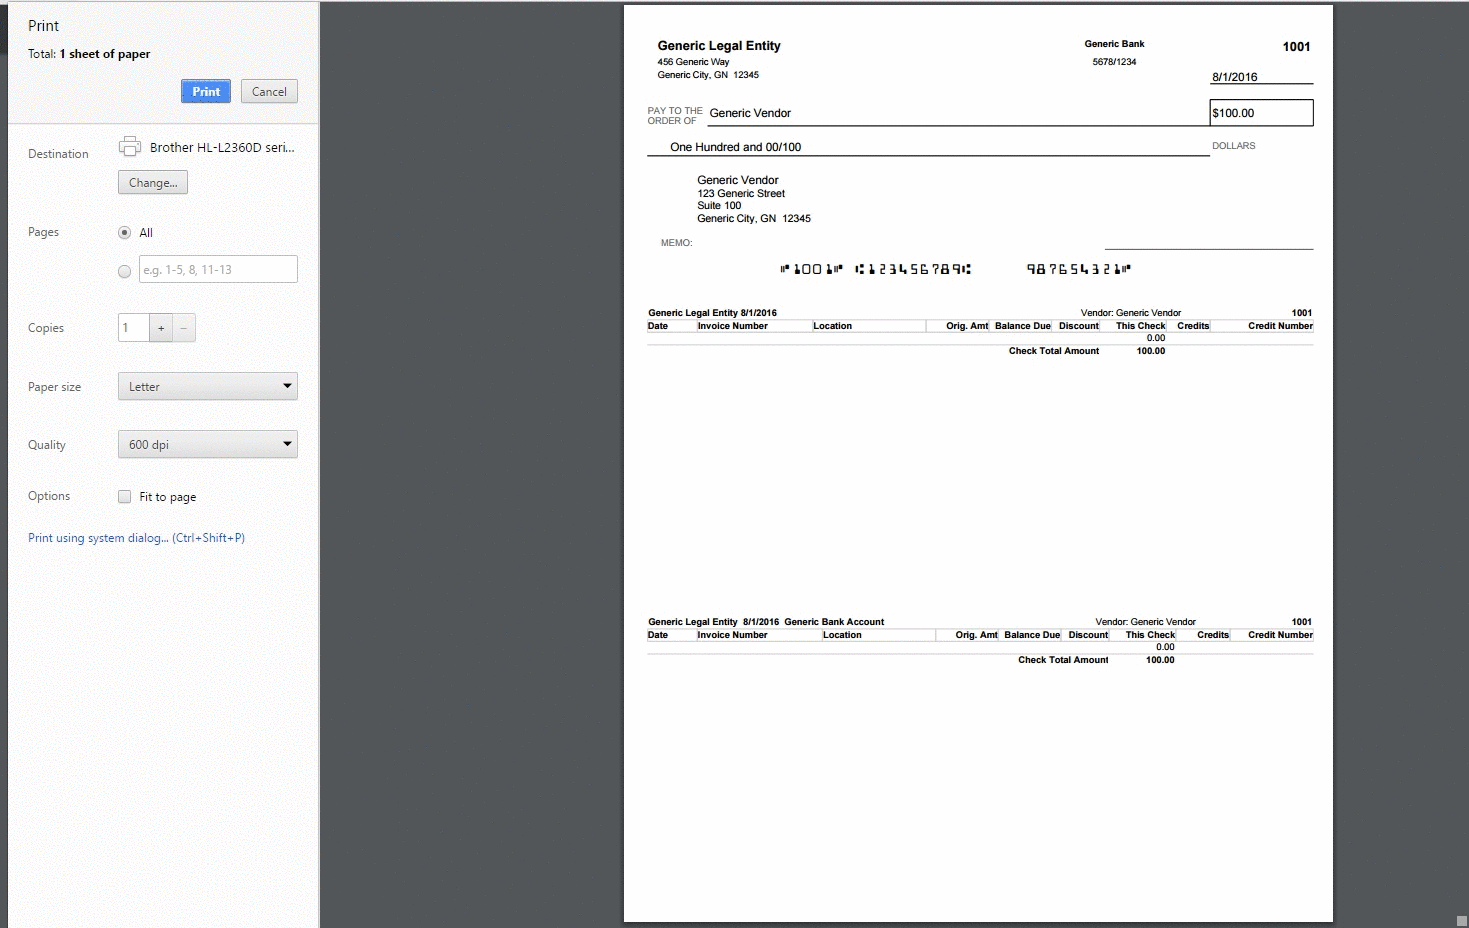
When printing from within Google Chrome, under the Options heading, ‘Fit to page’ is usually checked by default. To correctly print checks from Restaurant365 using Google Chrome, uncheck ‘Fit to page’. This will adjust the layout of the check and allow you to properly and correctly print the check to your blank check stock
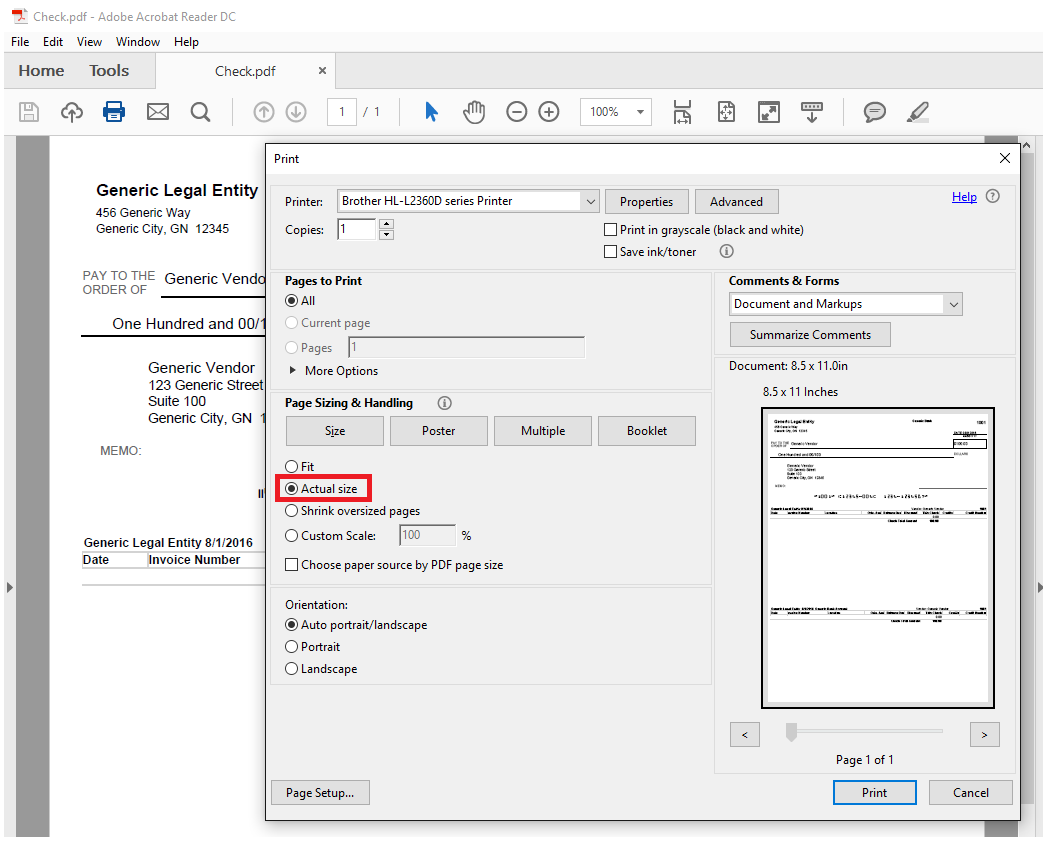
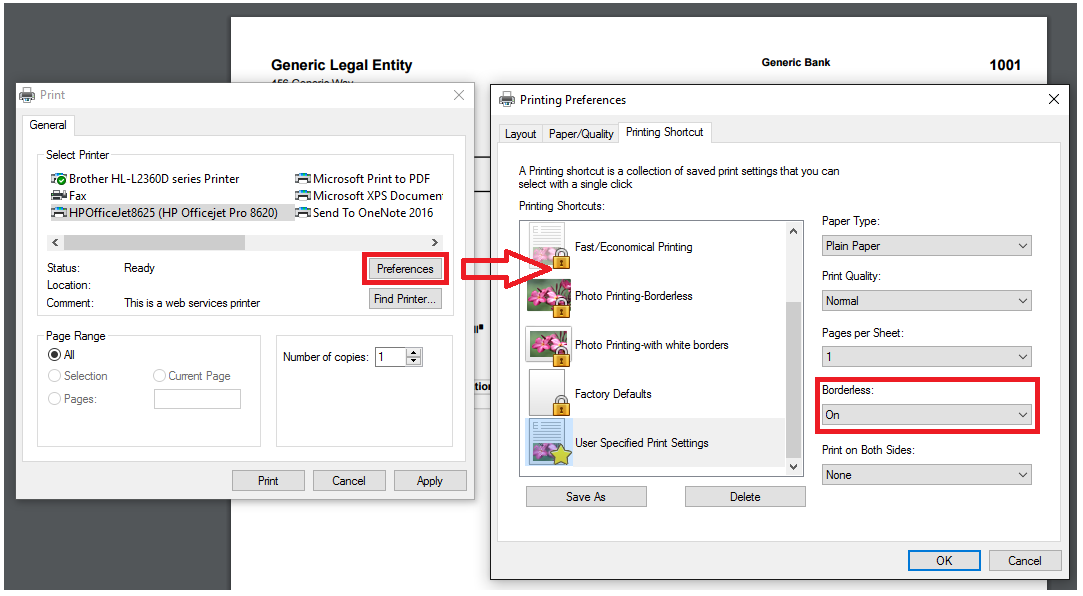
When printing using your system dialog, click on the ‘Preference’ button under the ‘Select Printer’ area. If your printer supports Borderless printing, you should see options similar to those in the sample image below. Enable Borderless printing by selecting ‘On’ and clicking ‘OK’. If there are no Borderless settings available, please use Google Chrome or Adobe Reader to print checks from Restaurant365.
There are four different ways to print a check to PDF in Restaurant365. Each of the following four sections explain the necessary steps to create a check via the particular method. Each step results in a generated PDF that can then be printed on to a physical check. Physical prints will be accomplished using your printer and system or browser dialog.
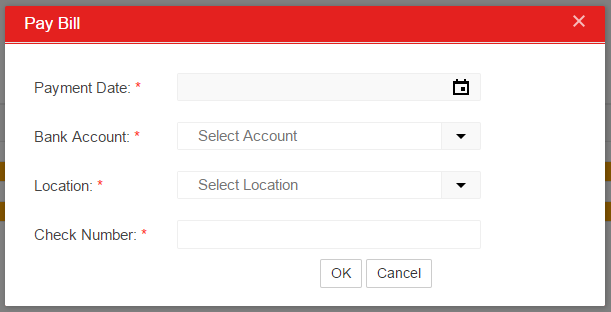
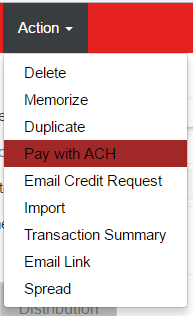
Back to Top 1. Pay a check from within a single Invoice – Pay Bill / Pay with ACH
While viewing an AP Invoice, hover over the Action menu and click Pay Bill / Pay with ACH. Depending on the Vendor Payment Methods, you will see either option. For Accounting Clerks without the Pay AP Invoice Security Role, these options will only appear on Approved AP Invoices. For Restaurant Managers without the Pay AP Invoice Security Role, these options will not appear.
Clicking Pay Bill will open either the ‘Pay Bill’ prompt or the ‘Pay with ACH’ prompt. The two are nearly identical, with the ACH prompt varying in the ‘Check Number’, auto-set to “ACH”, and the ‘OK’ button replaced with ‘Create’. On this prompt, the User can enter the Payment Date, select the Bank Account, set the Payment Location, and enter/adjust the Check Number (the next available check number will populate upon selecting the Bank Account). Upon completing the fields, click the OK/Create to generate the Check / ACH Payment
Clicking OK will generate a PDF of the check that will be saved to your default download location and can then be opened, and printed using your browser or system dialog.
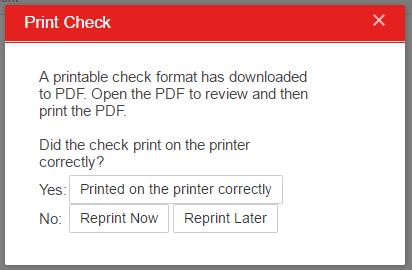
Following the generation of the PDF, Restaurant365 will open an additional prompt where the user will need to select an option to specify the results of the check printing:
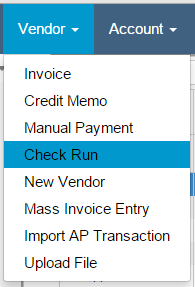
To pay multiple existing Approved AP Invoices, utilize the Check Run to generate multiple checks at once. Accounting Managers and Account Clerks have access to the Check Run screen. Accounting Clerks will only be able to Create Checks if they have the Pay AP Invoice Security Role. Restaurant Managers cannot access the Check Run. Click here for detailed information on Check Run 3. Create an AP Payment without an existing AP Invoice – Manual Payment
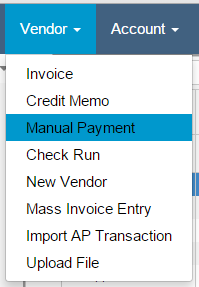
Manual Payments are AP Payments that are created prior to entering an AP Invoice in to Restaurant365. Essentially, creating a Manual Payment is creating the second half of the AP Invoicing process before completing the first half, or rather, creating the AP Invoice.
To create a Manual Payment, hover over the Vendor menu and click Manual Payment. This will open a new AP Payment tab where the User can enter in all of the required information for the AP Payment. Accounting Clerks without the Pay AP Invoice Security Role, will be able to create a Manual Payment, but they will not be able to Print Check on a Manual Payment until that Payment is Approved. Granting an Accounting Clerk the Pay AP Invoice Security Role will allow them to Approve and Print Check on a Manual Payment. Restaurant Managers without the Pay AP Invoice Security Role will not be able to create (or Print Check) a Manual Payment.
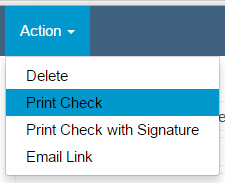
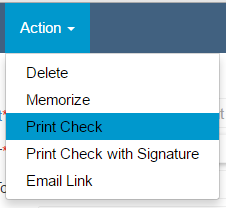
Once the AP Payment has been completed, hover over Action and select Print Check to generate the check
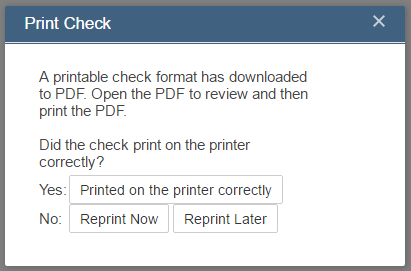
Clicking Print Check will generate a PDF of the check that will be saved to your default download location and can then be opened, and printed using your browser or system dialog.Image may be NSFW. Clik here to view.Following the generation of the PDF, Restaurant365 will open an additional prompt where the user will need to select an option to specify the results of the check printing:Image may be NSFW. Clik here to view.
Yes: Printed on the printer correctly – this action completes the AP Payment, closes the prompt, and marks the invoice as paid (applies the payment)
No: Reprint Now – this action will regenerate the PDF to be printed again
No: Reprint Later – this action closes the prompt, leaving the approved payment un-applied and un-printed
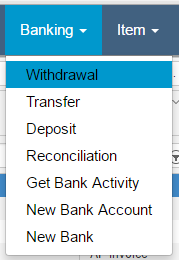
For non AP transactions, a check can be printed by creating a Bank Withdrawal on the Banking Menu.
To create a Withdrawal, hover over Banking and click on Withdrawal. Doing so will open a new tab where a Bank Expense (Withdrawal) can be entered. Accounting Clerks without the Pay AP Invoice Security Role, will be able to create a Bank Expense (Withdrawal), but they will not be able to Print Check on a Manual Payment until that Bank Expense (Withdrawal) is Approved. Restaurant Managers do not have access to the Banking menu in the top ribbon and therefore cannot create a Bank Expense (Withdrawal).
Upon completion of all the required fields, hover over Action and select Print Check to generate the check
Clicking Print Check will generate a PDF of the check that will be saved to your default download location and can then be opened, and printed using your browser or system dialog.
Following the generation of the PDF, Restaurant365 will open an additional prompt where the user will need to select an option to specify the results of the check printing:
Yes: Printed on the printer correctly – this action completes the Bank Expense (Withdrawal), closes the prompt, and marks the invoice as paid (applies the payment)
No: Reprint Now – this action will regenerate the PDF to be printed again
No: Reprint Later – this action closes the prompt, leaving the Bank Expense (Withdrawal) un-applied and un-printed
Restaurant365 allows users with the Security Role of Print Check Signature to print checks with a signature. For more information on printing checks with signature, see the Bank Account Record and Check Signatures training articles
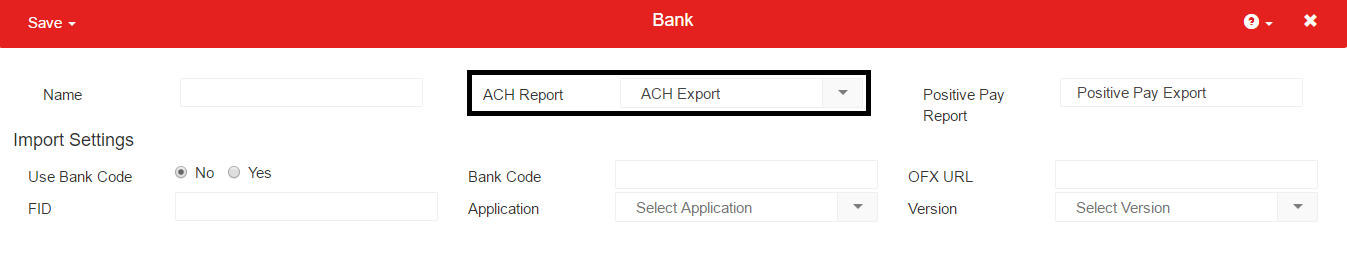
Restaurant365 has the capability of paying Vendors by ACH (Automated Clearing House) payment. Vendor-specific settings need to be entered on the Vendor Record prior to creating ACH payments. The ACH Report Type must be set on the Bank Record prior to creating ACH Payments. Click here for more information on ACH Report Types and the Bank Record
The following fields, located on the ‘Vendor Additional Info’ tab of the Vendor Record, must be updated in order to properly create ACH Payments
1) Payment Method – Payment Method needs to be set to ’ACH’
2) Bank Account Type – Select the Vendor’s Bank Account type. Either Business Checking or Business Savings
3) Bank Account Number – Enter the Vendor’s Bank Account Number where ACH payments will be received
4) Routing Number – Enter the Vendor’s Bank Routing Number
5) Email Address (located on the General tab) – Enter the Email Address of the Vendor Contact that will receive the Email ACH Stubs. Note: User Email Settings must be configured in order to email ACH Stubs
Update the fields then save the record.
The Vendor can now be paid via ACH. This can be accomplished from the ‘Action’ menu on an AP Invoice, or on the Check Run
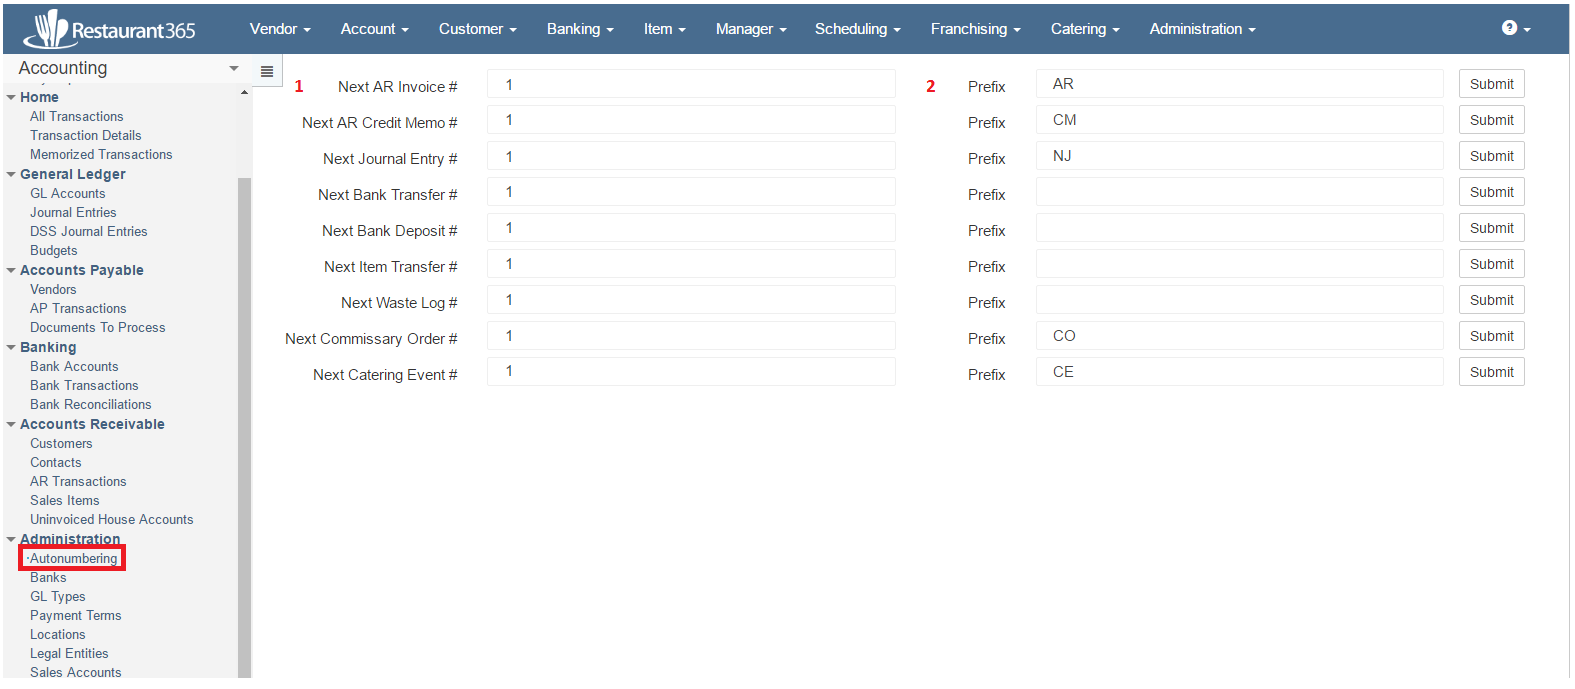
In Resaurant365, unique identifiers are important for numerous reasons. To allow for the easy creation of unique records, many transactions have an Autonumbering feature that is managed under the Administration section of the Accounting Module. When selected, the Autonumbering Next XX # (1) will be displayed next to the Prefix (if any) (2) as shown below. To save any adjustments to the next number, or prefix, be sure to click the Submit button to the right of each Autonumbering line item.
The Bank Withdrawal or Bank Expense form is used to create Payments to Non-Vendors and record Withdrawals directly from your Bank Account. No AP Invoice, AP Credit Memo, or Vendor Record will be associated with the Bank Expense. GL Accounts can be selected to separate and classify the expense amounts. Bank Expenses are one of the several ways to create printable checks using Restaurant365. Click here for more information on Printing Checks
Create a Bank Withdrawal / Bank Expense
Hover over the ‘Banking’ menu in the Top Ribbon and select ‘Withdrawal’. The Bank Expense form will then load in a new tab
1) Checking Account – The Bank Account that will be the source of the funds for the Payment / Expense
2) Number – The next check number for the Bank Account selected in the ‘Checking Account’ field. This field will auto-populate once a Bank Account has been selected
3) Paid To – Ether the payment recipient’s name as it will be printed on the check
4) Location – Select the Location the payment will originate from. This will be the User’s Default Location upon loading the Bank Expense form, but can be adjusted as needed
5) Check Memo – Enter a Check Memo line as it will appear on the printed check
6) Address – Enter the Address of the Paid To value. The value in the Address field will appear on the printed check. Click ‘Change Address’ to open the Change Address prompt where the address can be entered and saved
7) Amount – Enter the total amount of the Payment. The ‘Unassigned Amount’ warning will appear as no Expense Accounts have been assigned yet
8) Amount Text – The Amount Text as it will appear on the printed check. This is generated upon entering a value in the ‘Amount’ field
9) Date – Ensure you have the correct date in the ‘Date’ field.
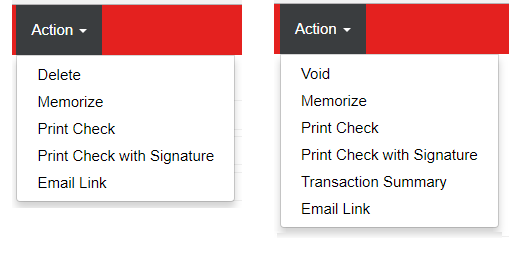
Void – Void replaces ‘Delete’ on Approved Bank Withdrawal. Voids the Bank Withdrawal. Click here for more information on Voiding
Memorize – create a memorized transaction using the Bank Expense as a template
Print Check – print the Bank Expense Check using the Print Check prompt
Print Check with Signature – this option will appear for Users with ‘Print Check Signature’. Print the check with the Signature uploaded to the Bank Account Record
Transaction Summary – Run a Transaction Summary Report for the Bank Withdrawal
Email Link – send an email with a link from the Bank Expense using Restaurant365. User Email Settingsmust be configured in order to use this feature
The Bank Transfer form is used to record the transfer of funds between an organization’s Bank Accounts. Restaurant365 does not initiate the transfer of funds with the bank itself. Transfers must be performed outside the system and then recorded in Restaurant365 using this form.
Create a Bank Transfer
Hover over the ‘Banking’ menu in the Top Ribbon and select ‘Transfer’. The Bank Transfer form will load in a new tab.
Void – Void replaces ‘Delete’ on Approved Bank Transfers. Voids the Bank Transfer. Click here for more information on Voiding
Memorize – create a memorized transaction using the Bank Transfer as a template
Email Link – send an email with a link from the Bank Transfer using Restaurant365. User Email Settingsmust be configured in order to use this feature
Intercompany Entries on Bank Transfers
When two Bank Accounts are selected that are owned by different Legal Entities, Restaurant365 automatically creates a corresponding ‘Intercompany Due To’ and ‘Intercompany Due From’ entry on the transaction. Once the Bank Transfer is Saved and Approved, the ‘Distribution’ tab will appear with the corresponding Intercompany Entries (if necessary).
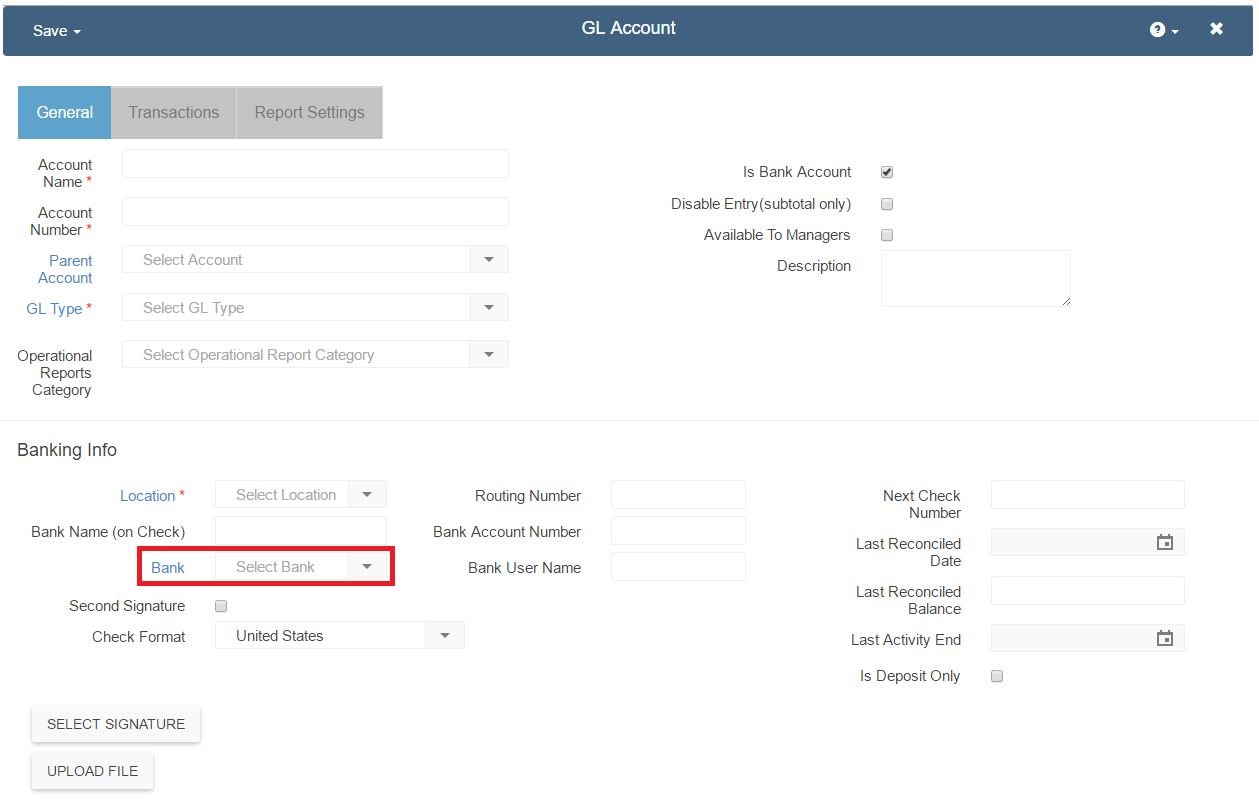
GL Accounts can also be classified as Bank Accounts by checking the ‘Is Bank Account’ checkbox on the GL Account Record. Click here for more information on GL Account Records. To create a new Bank Account, please see theAdd a New Bank Accounttraining.
When a GL Account is identified as a Bank Account, the GL Account will appear in the Bank Accounts List view (located under Banking in the Accounting Module), additionally the GL Account will be made available on the Bank Activity and Bank Reconciliation screens. Click here for more information on Bank Activity, and Bank Reconciliation.
The checkbox highlighted in red below is to specify if the GL Account is a Bank Account (an Account that will be made available in the Bank Accounts List View, as well as the Bank Activity / Reconciliation screens). Note: this checkbox will only appear when a GL Type with the Financial Report setting of ‘Balance Sheet’ is selected in the GL Type selector above (4). If the GL Account is a Profit & Loss Account (and therefor has a GL Type that has the Financial Report setting of ‘Profit & Loss’) this checkbox will not appear. When selected, Bank Account details appear on the GL Account Record.
1) Location – It is assumed that only one Legal Entity controls each cash account so it’s important to select a Location within the Legal Entity for this Bank Account. This field will help drive the intercompany accounts when money is transferred to cash accounts controlled by other Legal Entities
2) Bank Name (on Check) – Name of the Bank that will appear on the printed check
3) Bank – This field will identify the Banking Institution and the type of Bank Account. Click on the selector to choose the appropriate Bank. If the institution isn’t listed, click on the ‘Bank’ text to the left of the field, and a new tab will open where you can create the Banking Institution.
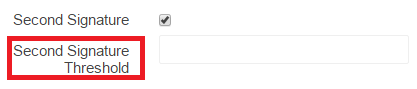
4) Second Signature – Click this box if a second signature is desired on checks from this checkbook. When checked this will show a another field called Second Signature Threshold where you set what dollar value for the check will require the 2nd signature. For example, if checks for $5,000 and above require a 2nd signature then check this box and put 5,000 in the threshold field. If 2nd signature is required on all checks then put $0 in the threshold field. This will make a 2nd signature line print on the check just above the regular signature line. You can still have a signature image print for the first signature if you desire (14), but the 2nd signature must be manually signed
5) Check Format – Select the Check format for this Bank Account. Options include United States, and Canada
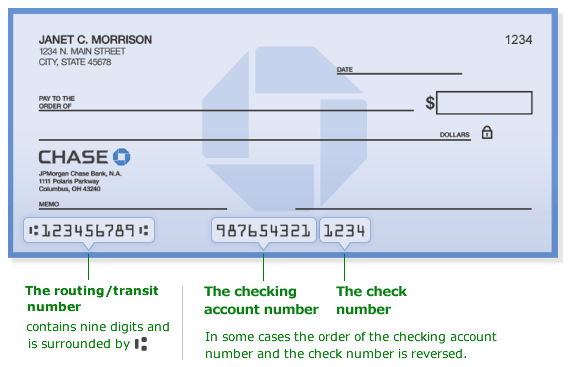
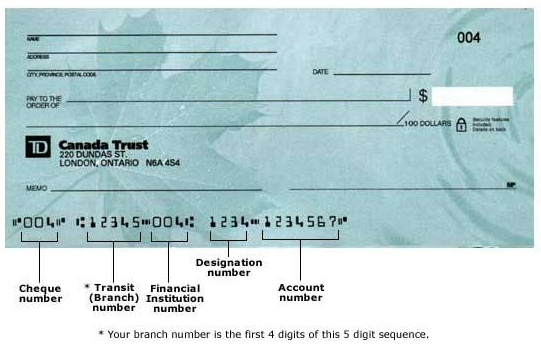
6) Routing Number / Transit Number – Enter the Routing Number (USA) / Transit Number (CAN) of the Bank Account (see below for screenshots depicting US and CAN checks).
Note: For Canadian Transit Numbers with a MICR Dash (Image may be NSFW. Clik here to view.) present, in the Routing (Transit) Number field, enter a capital ‘D’ in place of the MICR Dash
7) Bank Account Number – Enter the Account Number of the Bank Account
Note: For Canadian Account Numbers with a MICR Dash (Image may be NSFW. Clik here to view.) present, in the Account Number field, enter a capital ‘D’ in place of the MICR Dash
8) Next Check Number – Enter the next available check number. This will be used when printing physical checks from this account and will display in the MICR line on the check. It is important that these be exactly the same as given to you by your bank
9) Last Reconciled Date – Date the Account has been reconciled through
10) Last Reconciled Balance – Balance of the Account as of the last reconciliation
11) Last Activity End – The date of the last activity in this Account
12) Is Deposit Only – Check this box if this Account is for Deposits Only and you don’t want it as an option on the Check Run and Manual Payment screens
13) Bank User Name – User name for online banking – This will be used in ’Bank Activity’ if you use the automatic upload option
14) Select Signature Button – Clicking this button will open a prompt where the user can upload a signature file that will print on physical checks when ‘Print Check with Signature’ is selected. Printing checks with signatures requires a separate security role: Print Check with Signature.
Click the Sample Signature File button below to download a sample signature file that can be used in the creation of signature files for your Bank Accounts:
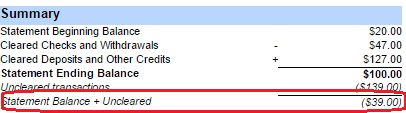
To make sure your bank balances to the GL, you should verify that the “Statement Balance + Uncleared” value on the reconciliation report (circled in red in image below) and the GL account balance for that bank account as of the same date match. There are a few reasons these values may not match. When you approve a bank rec it takes a snapshot of the system as of that time so the “Statement Balance + Uncleared” value on the reconciliation report is showing the balance according to that snapshot.
Example 1 “Entered a transaction after completing the bank rec”: Let’s assume you’ve doing a bank rec with a statement end date of 10/31 and you approve it on 11/8. Then on 11/15 you enter a new bank withdrawal transaction and date it 10/28. If you run a report to see the GL account balance of your bank account (such as Trial Balance, Balance Sheet, GL Account Detail reports) as of 10/31 then this 10/28 transaction will be reflected in that balance. However, the reconciliation report is based off the snapshot of the time when the bank rec was approved so this transaction will not be included in the balance of that bank rec so there will be a discrepancy. If you don’t want the discrepancy to show up, you will need to unapprove the bank rec which will then pick up this new transaction and then approve the bank rec again. This transaction will now show in the uncleared list on that bank rec and will be part of that balance on the reconciliation report.
Example 2 “User entered wrong statement beginning balance on a bank rec”: The beginning balance on a bank rec defaults as the ending balance from the previous bank rec but the user can override this value if desired. If the user puts the wrong value in this field then the math on this bank rec won’t balance with the previous rec which might cause it to be out of balance with the GL account.
Example 3 “Started with incorrect beginning balance went went live with system”: Let’s assume you started using the system and put a beginning balance for the GL account of this bank account of $100 in your beginning balance journal entry. Then you set the Last Reconciled Balance for that bank account as $150. If the last reconciled balance was $150 according to your bank and the actual balance in the account was $100 according to your prior financial system, then that means there are $50 of expenses in your prior system that need to be entered as Open Bank Transactions (unreconciled transactions) to start in this system. If you didn’t enter those $50 of expenses as bank beginning balance transactions or entered an amount other than $50, then you will be out of balance because to start the system your GL was already out of balance from the bank.
There are various other reasons they might differ such as making an edit to a transaction after reconciliation or voiding a reconciled transaction.
Bank to GL Reconciliation Report Will Help
To help you investigate the reasons for the difference you can run the report titled “Bank to GL Reconciliation” in the Banking section of the My Reports page. For this report you can select the bank account you want to evaluate, the bank rec you want to evaluate it as of, and choose whether to show Only Out of Balance Reconciliations, All Reconciliations. or This Reconciliation Only. Because of the huge amount of data this report is analyzing to find possible balance problems, it may take some time to run.
Once you’ve selected your parameters and run the report, it will display a row for each reconciliation with a + sign on the far left (circled in red in image below). Clicking the + sign will show all details for the reconciliation. Clicking the blue date on the reconciliation row (circled in red in image below) will open that bank rec. In the far right column of each detail row that might be causing a balance issue, there will be a comment (circled in green in image below). The comment will be a description of why that row might be causing an issue such as “Not on rec, maybe trx was approved after rec was approved” as explained in Example 1 above. You can also open the transaction on a detail row by clicking the blue transaction type link (red arrow in image below).
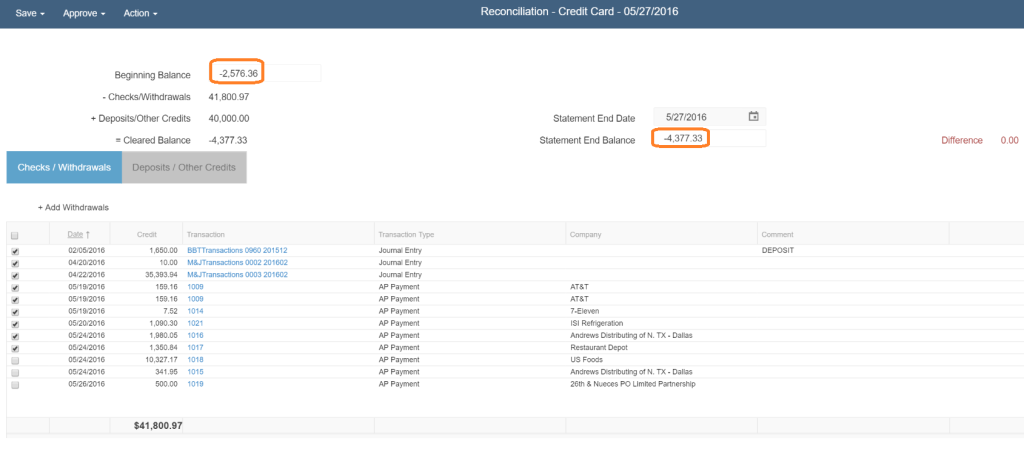
In order to reconcile a credit card, the credit card must be set up like a bank account so that you can create reconciliations for that account. For more information on setting up accounts click here.
After you have set up the credit card as a bank account and have began to accrue activity, you will start a bank reconciliation for that account. For more information on bank reconciliations click here.
The main thing to remember when starting a bank reconciliation for a credit card account, is that the credit card is a liability. Consequently, you will need to change the beginning and ending statement balances to be negative. Then check off your transactions as you normally would to reach a difference of 0 on the bank rec.
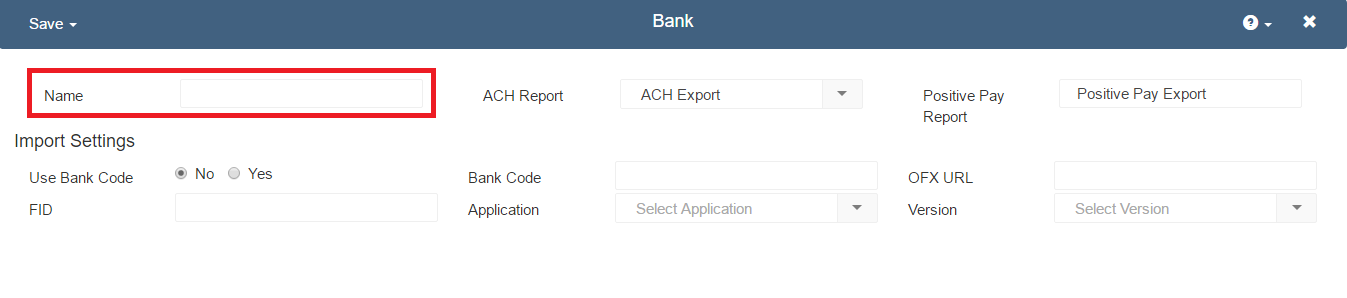
When setting up Bank Accounts in your General Ledger, you may need to add a ‘Bank’ to Restaurant365. A Bank must be created for each Bank that will be represented by Bank Accounts in your General Ledger.
Create a Bank
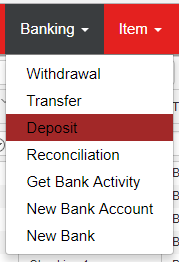
There are two ways to create a Bank in Restaurant365, the first is from the Banking menu on the top ribbon. Hover over Banking and select New Bank
The second option is to create a Bank from within a Bank Account Record that you are setting up. First confirm that your Bank does not already exist in the system by clicking the Bank drop down. If the desired bank is not present, click on the Bank text to the left of the Bank selector.
This will open a new Bank record. Fill out the bank name and then Save and Close. Note: If you are using the online banking feature in Bank Activity then you will need to fill out the Bank Code, FID, etc. This information must be obtained from your banking institution.
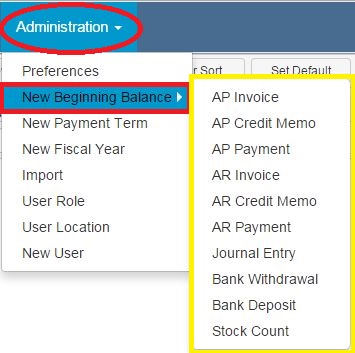
When implementing Restaurant365 you will need to input beginning balance transactions for GL Balances, Open AP Transactions, Open AR Transactions, and Unreconciled Bank Transactions. The majority of beginning balance items will be imported during the implementation process. However, after go-live you may identify some discrepancies that may require you to add some additional beginning balance transactions.
To add a new beginning balance transaction for GL Balances, Open AP, Open AR, or Unreconciled Bank Items, follow the steps below.
Select ‘Administration’ in the top ribbon and then select ‘New Beginning Balance’. This will open a list of available beginning balance options.
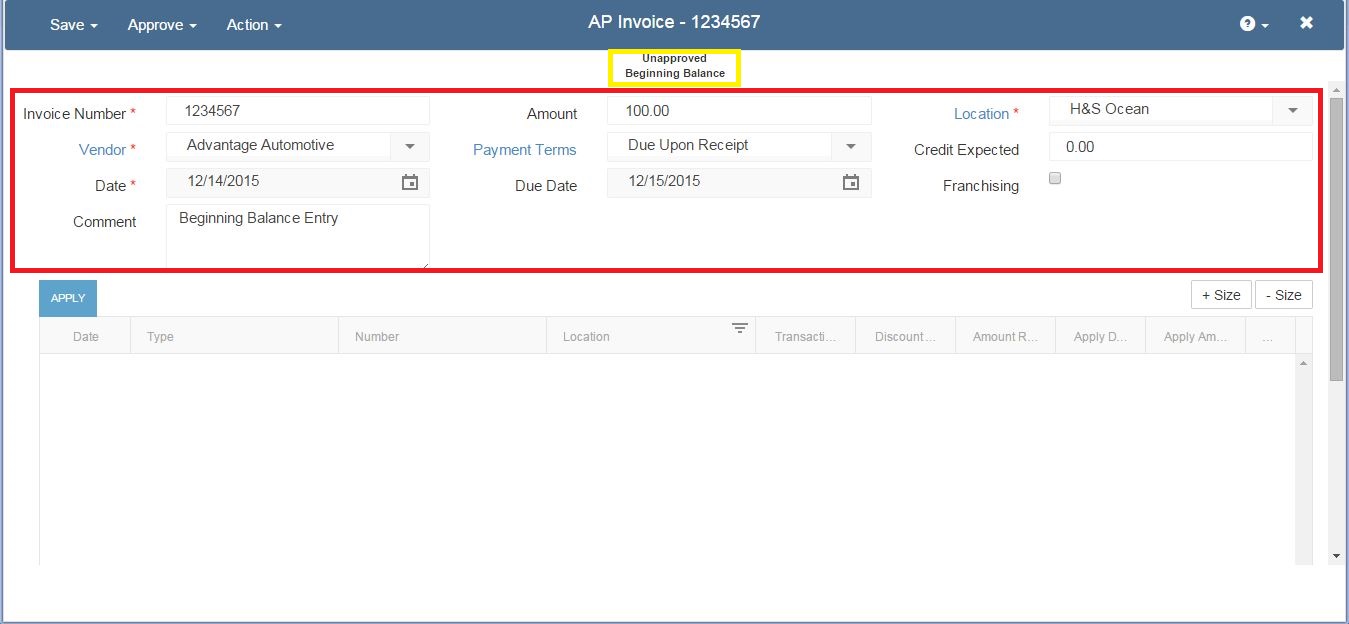
AP Invoice – Any AP invoices not fully applied to AP payments or AP credit memos AP Credit Memo – Any AP credit memos not fully applied to AP invoices AP Payment – Any AP payments not fully applied to AP invoices AR Invoice – Any AR invoices not fully applied to AR payments or AR credit memos AR Credit Memo – Any AR credit memos not fully applied to AR invoices AR Payment – Any AR payments not fully applied to AR invoices Journal Entry – For inputting GL Historical Balances Bank Withdrawal – Any unreconciled Bank Withdrawals (Expenses) Bank Deposit – Any unreconciled deposits Stock Count – For inputting beginning stock counts – prompts user to select the appropriate stock count template for the beginning count
Select the appropriate beginning balance option. for this example we will show a beginning balance AP Invoice. As you can see, the Beginning Balance AP Invoice looks just like a normal AP invoice, except that there is no detail grid for entering detail line items. This is because the beginning balance transaction does impact the GL. It is entered into the system to allow a future payment to be applied to it.
You will notice that the transaction shows ‘Beginning Balance’ under the status. Enter the Invoice Number, Vendor, Date, Comment, Amount, Payment Terms (may be prepopulated if a payment term is assigned to the vendor), and Location.
Once all the information is entered select Save or Approve to complete the transaction. Repeat these steps for additional beginning balance transactions.
That covers Entering Beginning Balance Transactions. Thank you for attending this training session. This article is one of many training sessions available to you on-demand. We invite you to continue your training so that you can get the most out of Restaurant365 to help your restaurant reach it’s full potential.
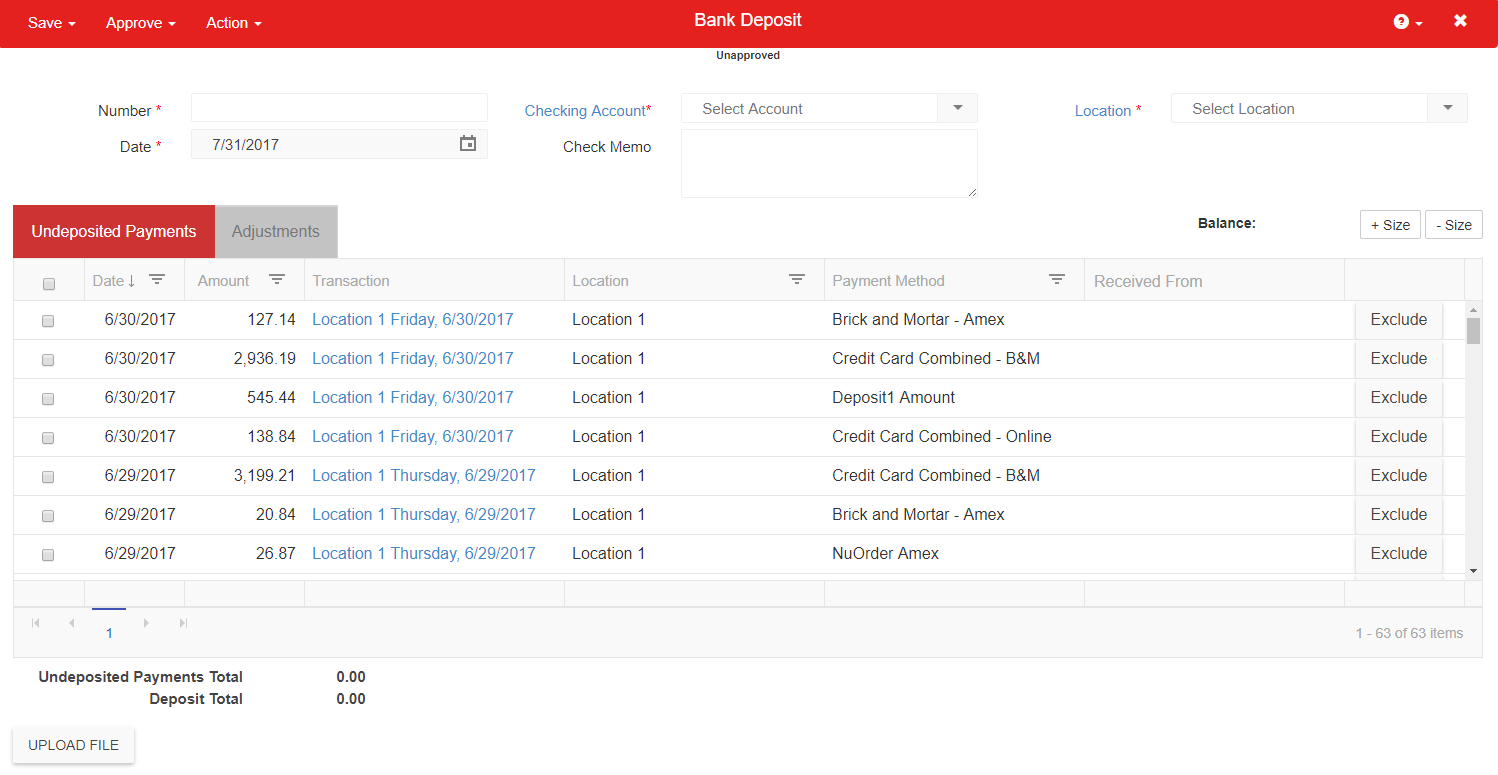
The Bank Deposit form is used to record the depositing of funds, from any source, to a Bank Account. The Bank Deposit form pulls any Undeposited Transactions from the GL Account assigned to the ‘Undeposited Funds’ field in System Preferences: Default Accounts. Manual Deposits can also be created using the Bank Deposit form. Bank Deposits are used when auto-matching uploaded Bank Activity and when performing a Bank Reconciliation
Create a Bank Deposit
Hover over the ‘Banking’ menu in the Top Ribbon and select ‘Deposit’. The Bank Deposit form will load in a new tab
1) Number – The Auto-generated Number for the Bank Deposit. Starting Numbers and Prefixes can be adjusted on the Autonumberingpage
2) Date – The Date of the Bank Deposit. Will default to the Current Date
3) Checking Account – Select the Checking Account where the Deposit will be recorded
4) Check Memo – Enter a Check Memo for the Deposit. Check Memos can be used in Auto-matching Bank Rules in Bank Activity
5) Location – The Location of the Bank Deposit. Will default to the User’s Default Location
Undeposited Payments tab
The contents of this tab comprise all Cash Receipts that have yet to be deposited. This tab can be used to group the deposits together for a more streamlined ‘auto-match’ when uploading Bank Activity.
1) Checkbox – Select individual payments to be included in the Bank Deposit
2) Date – The date the payment was received
3) Amount – The dollar amount of the received payment
4) Transaction – Individual ‘Transaction’ links to the record that created this Payment
5) Location – The Origin Location of the Payment
6) Payment Method – The Payment Method of the Payment
7) Received From – Who the payment was received from (used in conjunction with Customer records when receiving AR Payments)
8) Exclude button – Click this button to permanently Exclude this Deposit from appearing in the ‘Undeposited Payments’ tab on the Bank Deposit form. Note: Excluded payments cannot be re-included. Do not click exclude unless certain of desired exclusion
9) Checking Account Balance – The Checking Account Balance of the Account selected in the Header
10) Selected Payments Total & Deposit Total – The sum total of all Selected Payments (checkbox = checked) and the Total Deposit Amount (includes any Adjustments)
Note: If grouping payments together, click on the ‘Payment Method’ column to sort the data in the grid by Payment Method or click on the small triangle to the right of the word to restrict the view to a specific Payment Method. This is very helpful when grouping together deposits of a similar method across multiple days.
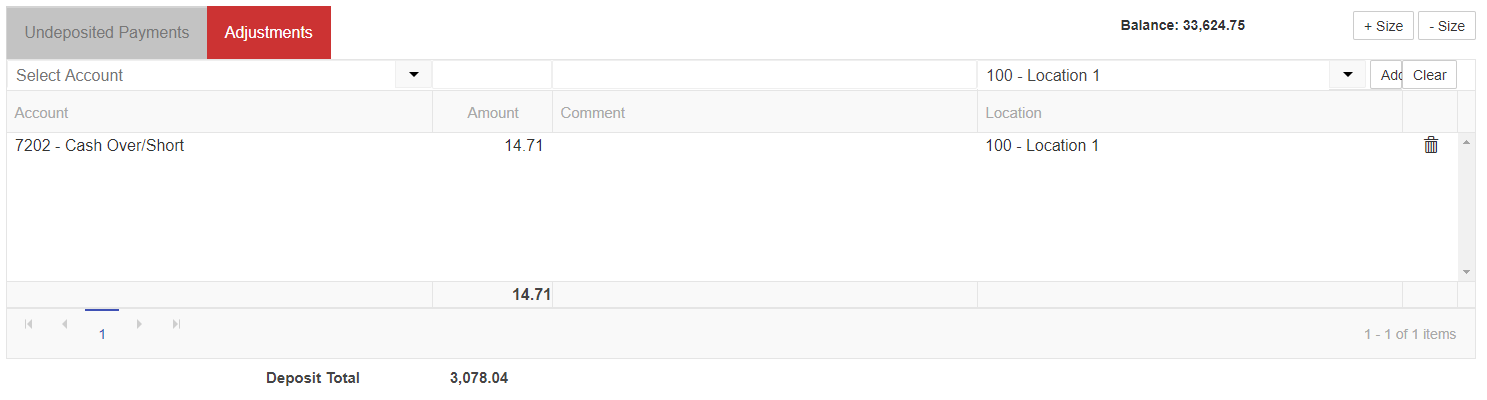
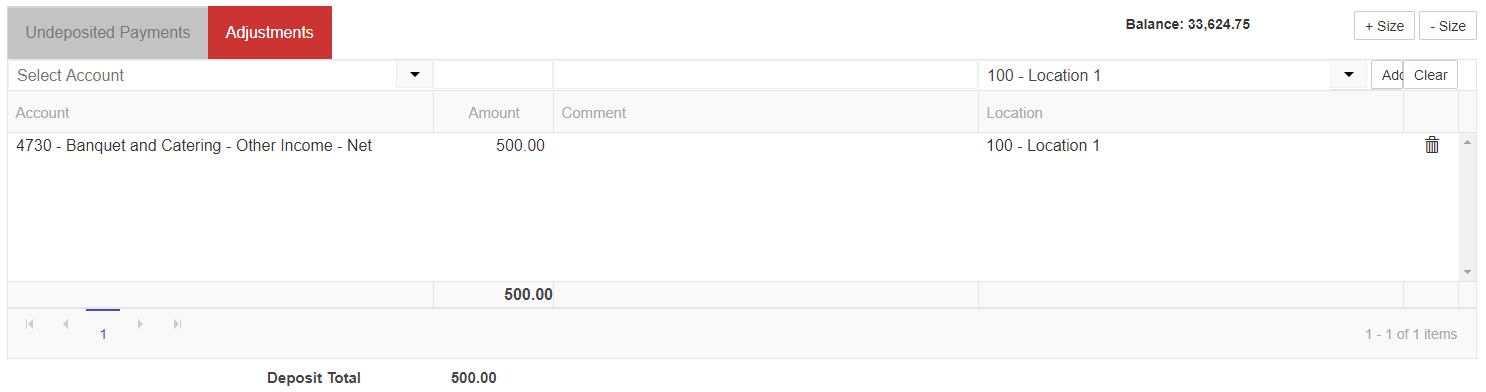
Adjustments tab
Adjustments can be made to the selected Deposits from the Undeposited Payments tab, or new Deposits can be entered without any Undeposited Payments.
Adjustments with Undeposited Payments
There are several reasons a Deposit Amount actually deposited doesn’t tie directly to the amount of the Daily Sales Summary or AR Payment. Regardless the reason, the easiest way to account for the discrepancy is to record the difference on the ‘Adjustment’ tab after selecting the payments to be deposited. The Deposit Amount can be adjusted to increase or decrease the total Amount.
To enter an adjustment, select the Adjustment GL Account (this may be ‘Over/Short’ or a specific expense/income account if we know the reason for the difference), then the Amount, add an optional comment, then select the Location. Click ‘Add’ to add the Adjustment Detail line. Enter a Positive number for an Increase adjustment or a Negative number for a Decrease adjustment.
New Deposit – Adjustments without Undeposited Payments
The Adjustment tab can also be used to record miscellaneous Deposits not related to any previously received payments.
To manually create a Deposit, select the Payment Source GL Account (this may be ‘Over/Short’ or a specific expense/income account), enter the dollar Amount, add an optional comment, then select the Location. Click ‘Add’ to add the Deposit Detail line
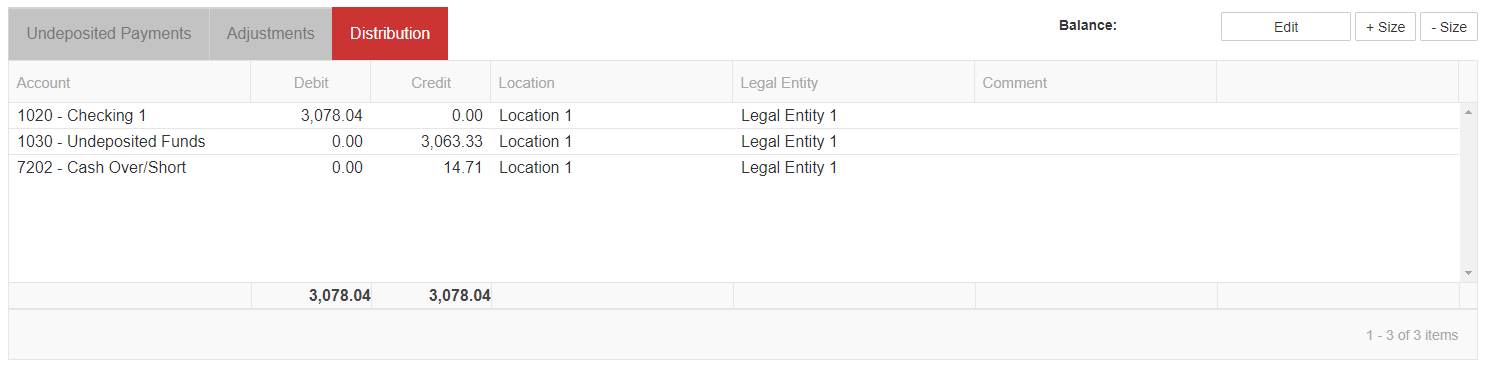
Upon Saving or Approving either type of Deposit, the ‘Distribution’ tab will appear where we can see the Deposit distribution, including any adjustments that were entered
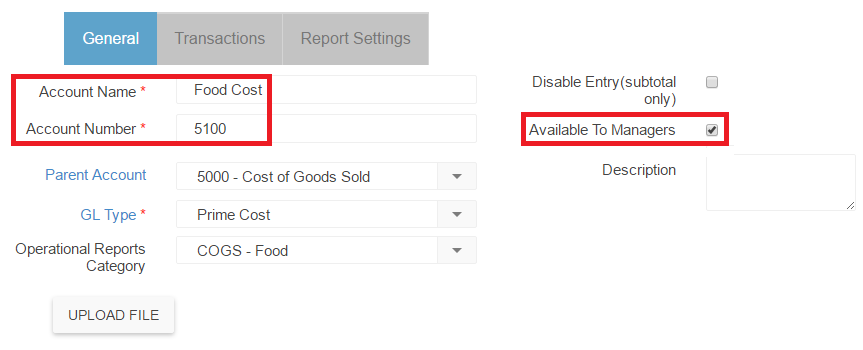
If non-Accounting users (Users with the security role of Restaurant Manager) need access to a GL Account, that Account must be flagged as Available to Managers. As non-Accounting users do not have access to the Accounting Module, they will never see the General Ledger in its entirety, nor will they have the access to open a GL Account Record to view GL Transactions. However, it will be necessary for Restaurant Managers to have limited access to some GL Accounts for Invoicing, and DSS Review
For Accounts that have Available to Managers enabled, the Account Name / Number will be made available in Account Selector dropdowns in the Operations Module to Restaurant Manager users.
This is accomplished on the GL Account Recordvia a Check/Unchecked setting on the Account and can be changed as needed. As a best practice, Cost (including COGS) and Expense Accounts should be made Available to Managers.
Click the button below to download an example General Ledger populated with recommended Account Names, Account Numbers, and if those Accounts should be made Available to Managers from the National Restaurant Association (NRA):
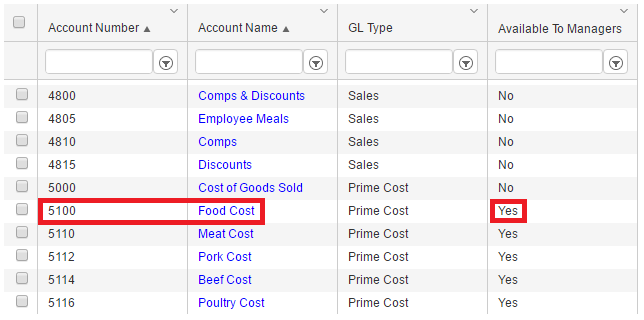
Additionally we can see that the Available To Managers box has been checked (value of ‘Yes’) for this Account when we are viewing the GL List View in the Accounting Module. Notice that Account #5000 has a value of ‘No’ for Available To Managers.
On an AP Invoice when the Restaurant Manager User attempts to select the GL Account that will be used on the Transaction line item, Account #5000 (Available To Managers left unchecked) is not visible, while Account #5100 is visible and is selectable in the Account Selector dropdown. The Available To Managers Account will now appear in any Account selectors a Restaurant Manger would have access to throughout the system.
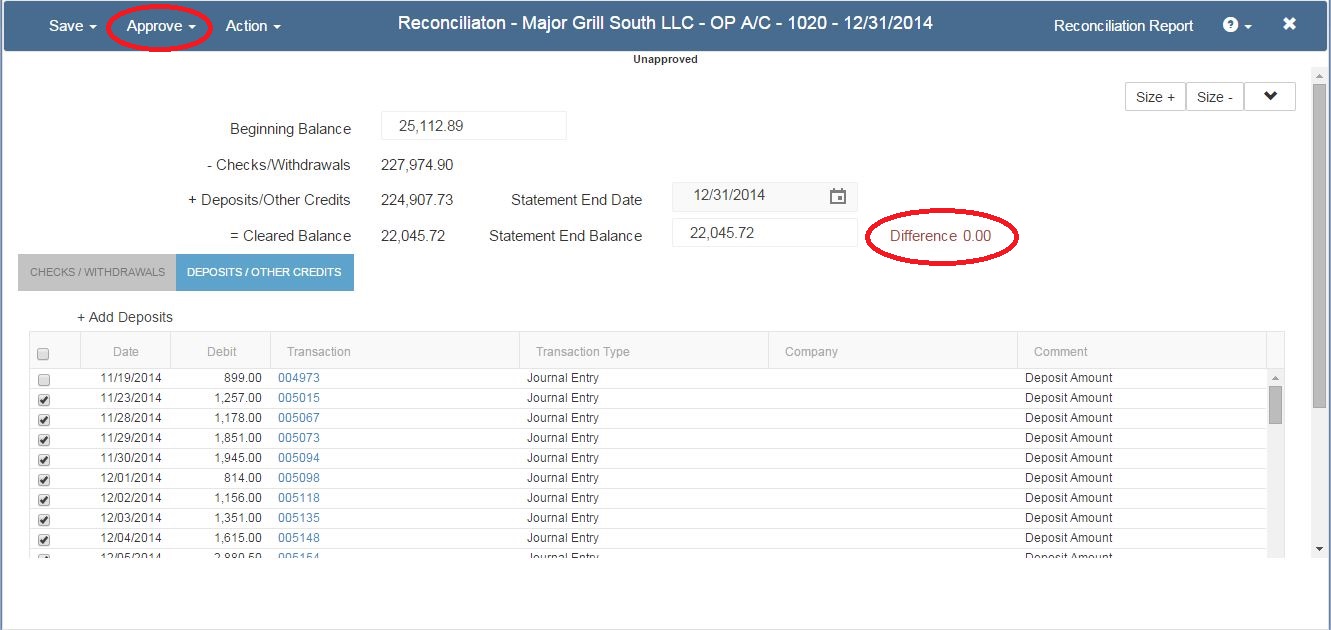
A Bank Reconciliation is a period end (or month end) procedure used to ‘true-up’ the records in your accounting system to the actual activity in your bank account (as reported by your bank.)
Step 1: Make sure to have a copy of your bank statement or online statement ready.
Step 2: Begin a new reconciliation
Step 3: Match the transactions in Restaurant365 with the ones one your statement until the indicated difference is 0
Step 4: Make sure all the voided transactions are cleared from your reconciliation.
Step 5: Approve and print the reconciliation
Step 1:
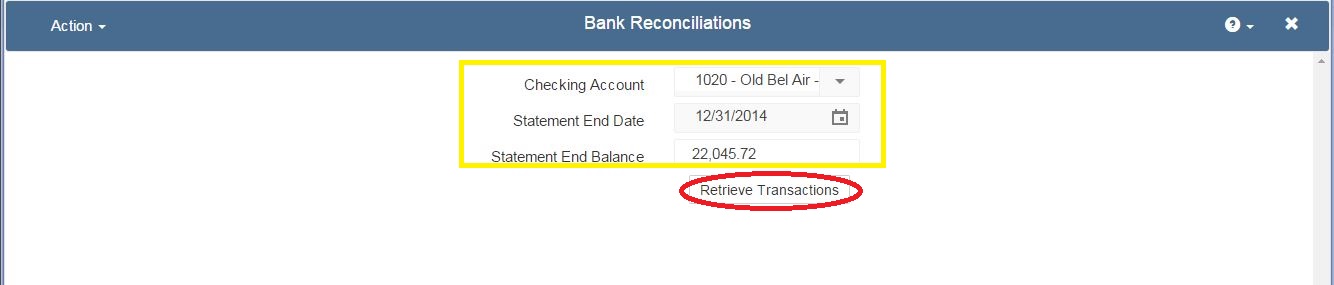
Before beginning your reconciliation, make sure to have a copy of your bank statement or online statement in front of you. To begin reconciling your bank account, click on ‘Reconciliation’ in the Banking section of the ribbon. The New Bank Reconciliation window appears and asks you to select the checking account, statement end date, and statement ending balance. Once those are filled in, hit the ‘Retrieve Transactions’ button. This will retrieve all the transactions for this account up to the statement date you entered.
Once those are filled in, hit the ‘Retrieve Transactions’ button. This will retrieve all the transactions for this account up to the statement date you entered.
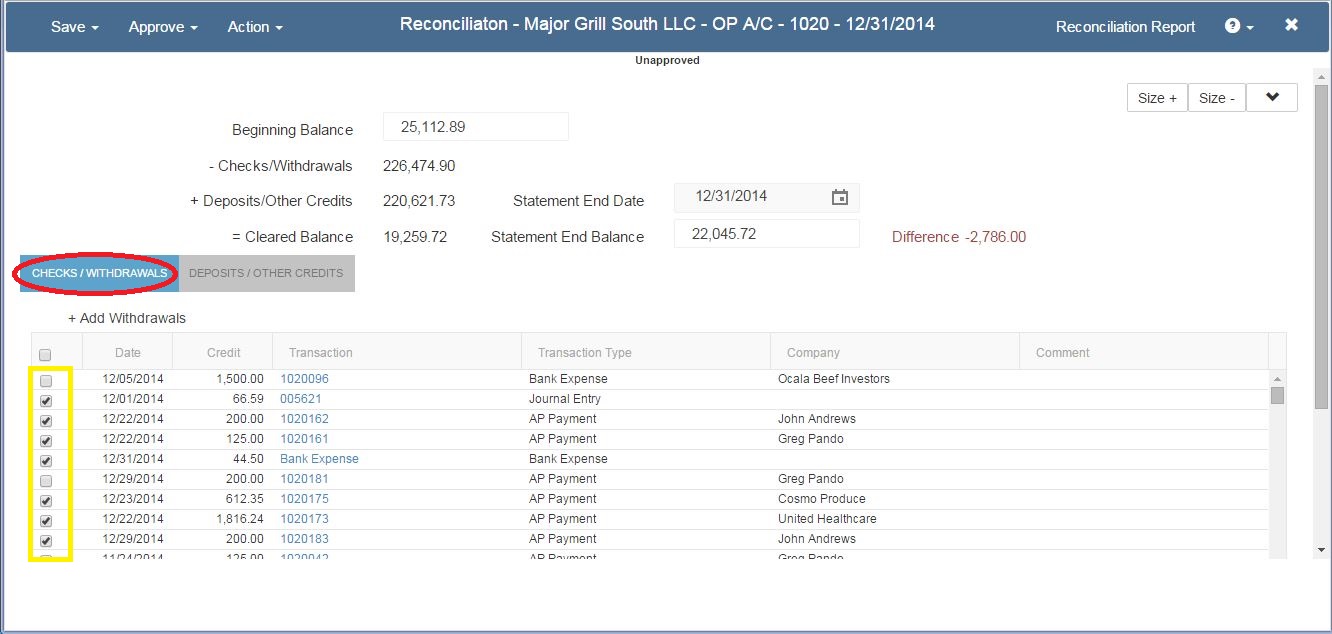
The screen will save and refresh the ‘Name’ of the reconciliation. It is now changed from ‘New’ to: (Checking Account Name) – (Date) – Reconciliation. As always, it begins in an unapproved status.
The four fields on the top left are non-editable. The first is the beginning balance which is the last reconciled balance. (If this is the first time reconciling this account, you can add the ‘Beginning Balance’ by entering it on the GL Account record for this checking account. There is a field called ‘Last Reconciled Balance’ in the ‘Banking Info’ section of the GL Account.)
The next three fields (Checks/Other Expenses, Deposits/Other Credits, and Cleared Balance) are all automatically updated as we mark the individual transactions in the grid below. The Statement End Date and Statement End Balance were entered in our first step. Although you would not normally do this, you are able to adjust on the fly the Statement End Balance, in which case the Difference field will automatically recalculate.
Step 3: Match transactions in R365 with those on your bank statement
The ‘Checks / Withdrawals’ tab appears first. Click on each individual check or withdrawal as it is shown on your bank statement. You can sort the list by any column or even multiple columns. Clicking once on a column will sort ascending, clicking a 2nd time sorts descending, and clicking a 3rd time turns off sorting on that column.
If a transaction is matched to bank activity for a date greater than the reconciliation date, it will show in this list with a comment describing which bank activity it is matched to currently. There is an Unmatch button on the row so the user can unmatch that bank activity if it is supposed to be reconciled on this reconciliation instead (image below).
You can drill down on any transaction by clicking on the blue colored Number field.
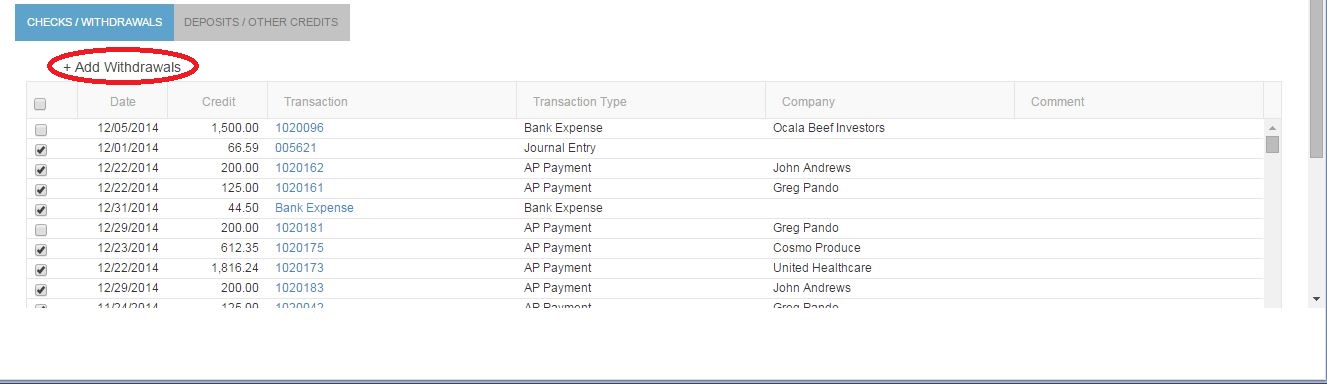
If there is a withdrawal on your bank statement but not in Restaurant365, you can add one quickly on the fly by clicking on the ‘+ Add Withdrawal’ button.
Upon doing so, the header of the grid expands and allows you to select the account, amount, date, number, description, location, legal entity, and concept that the withdrawal pertains to. Once done, click the ‘Add’ button and the header collapses again and returns you to the previous view.
After you have added the withdrawal, you will notice that the withdrawal you just added is already marked for reconciliation.
Once done with the checks and withdrawals, click the ‘Deposits / Other Credits’ tab and repeat the same steps taken for clearing the checks and withdrawals. If you need to add a deposit that wasn’t in Restaurant365 previously, click on the ‘+ Add Deposit’ button and follow the same steps. Remember that Legal Entity is a required field. Once you hit add to create the additional deposit, you will be returned to the ‘Deposits / Other Credits’ view and the newly created deposit will be marked for reconciliation.
During the process of reconciling the Deposits / Other Credits, it is often helpful to keep open the Deposit form (which can be launched from the Top Ribbon by clicking on ‘Banking’ and then ’Deposit’.) This is helpful because if you don’t see a deposit on the Bank Reconciliation but do see it on your bank statement, there is a strong possibility that the receipt of the funds has been recorded in Restaurant365 but simply has not yet been added to a ‘Deposit’ transaction and approved, which will add it to the Bank Reconciliation screen. Keep in mind that if you have the Bank Reconciliation window open, and then you create a new Deposit (and hit Approve & New on the Deposit) it won’t appear on the Bank Reconciliation until click on the ‘Refresh’ button or you close and reopen the Bank Reconciliation form. It’s a good idea to go through and do all of your deposits to match exactly the way they were received by the bank before completing the Bank Reconciliation. It’s the first rule of reconciling a bank statement: enter everything exactly the way it was received by or paid out of the bank. This makes reconciliation a snap later.
If you are using the Bank Activity feature regularly, many of the transaction will already be marked as reconciled by the time you are ready to do a month end reconciliation. See the Bank Activity training video for more details.
Step 4: Make sure all the voided transactions are cleared from your reconciliation.
At this point, we need to pause and insert a comment about clearing voided transactions. If you find a voided transaction on your bank reconciliation (you will know this because the number will end with a ” – V”) it is because someone voided a previously reconciled transaction. This should be very uncommon. If this happens, you will want to clear out the voided transaction on the current bank reconciliation. In order to do this, you will need to offset the void by creating a new Credit or Withdrawal (depending upon the type of voided transaction you see) and mark them both – thus creating a net zero effect to the Ending Balance on the reconciliation. To be more specific, if you see a voided Payment on the Deposits / Other Credits tab, then create a corresponding withdrawal on the ‘Checks / Withdrawals tab. And if you see a voided check on the ‘Checks / Withdrawals’ tab, create an offsetting Credit on the ‘Deposits / Other Credits’ tab. In both cases, make sure to mark both the void and the offset transaction. As for which account to pick on your newly created transaction, you might drill down on the voided transaction to find out the details of the original transaction. In the end, this part is up to you as an accountant! Just remember what is going on, there was a transaction that did in fact clear your bank or was mistakenly marked as reconciled on last month’s reconciliation. Then, that transaction was voided in a subsequent month, and the debits and credits of the original transaction were reversed. Now, that voided transaction must be offset in order for Restaurant365 to match the bank statement this month.
Step 5: Approve and print the reconciliation
Let’s transition back to the reconciliation. After all the transactions on your bank statement are accounted for, the difference in the header of this reconciliation will be $0.00.
At that point you can Approve the reconciliation or Save it. If you choose to save the reconciliation, you will not be able to start a new one for the same checking account until that one is either or approved or deleted. Only one reconciliation can be in progress for each checking account at a time.
Keep in mind that when you ‘Approve’ a Bank Reconciliation, you are not approving a transaction but rather indicating that a certain set of transactions (within a given time period), are in sync between your system and the bank. As we pointed out, during the reconciliation process you may add deposits or withdrawals on the fly (which are automatically approved when added). These adjustments can be voided at a later time by opening up those individual transactions. This is unlikely however because by reconciling it, you are indicating that it is a valid adjustment as reported by your bank. You may not, however, void a ‘Reconciliation’. A final note on this topic, when any transaction is included on a bank reconciliation, it can no longer be ‘unapproved.’ Reconciling a transaction locks it down – a powerful control of your cash.
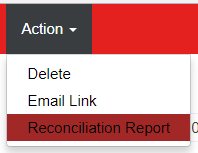
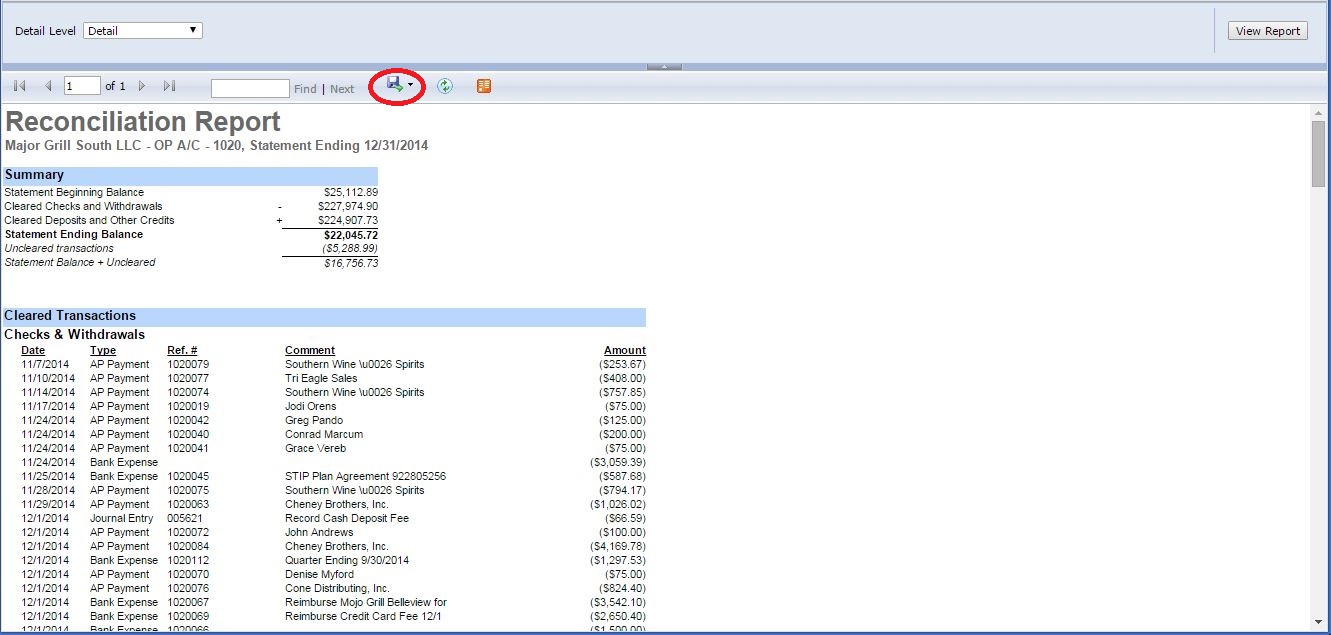
Reconciliation Report
The ’Reconciliation Report’ is located in the ‘Action’ menu. Click this to generate the Reconciliation Report that will display all the cleared transactions along with the beginning and ending account information. You will be able to run this at any time during the Reconciliation process.
Note: If a change is made to any transaction included on the reconciliation after reconciling, the report will not reflect that change. Once a transaction is reconciled, it is highly unlikely the transaction would need to be modified. Restaurant365 places a visual cue on each transaction that is cleared on a bank reconciliation. The visual cue is the appearance of two fields at the bottom of each transaction. One showing the date of the reconciliation and the second is a link to the actual reconciliation itself. This is helpful to know if you ever are trying to make a change to a transaction and are unsure if it has already been cleared by and reconciled to the bank.
Additional Tips: We’ve included a description of how the system handles voiding associated with bank reconciliation for future reference. There are 3 scenarios:
Voided before it clears the bank – nothing will show up on bank rec because its cancelled
Clears bank (meaning vendor cashed it) and user has already reconciled it – The reversing/voiding side of the entry will then show up on bank rec because voiding something that already cleared the bank would require some sort of communication with your bank to get credited for something that already cleared. If they are crediting you then this reversing/voiding side of the entry would balance with that bank credit. If the original cleared the bank and the bank is not crediting you for it now, then you probably don’t want to void it.
Original transaction was made by mistake but the user checked it off on bank rec even though it didn’t match to a transaction on the bank statement – That would probably keep the bank rec from balancing to $0 so then the user might make an adjusting entry on that bank rec to get it to balance. If that happened and then the user later wanted to void the original transaction, they would want to void the adjusting entry they made as well.
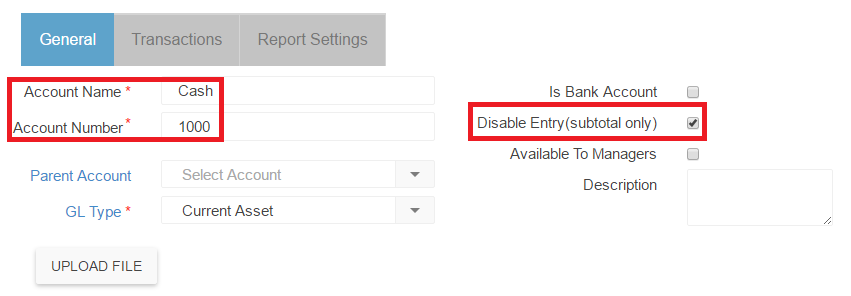
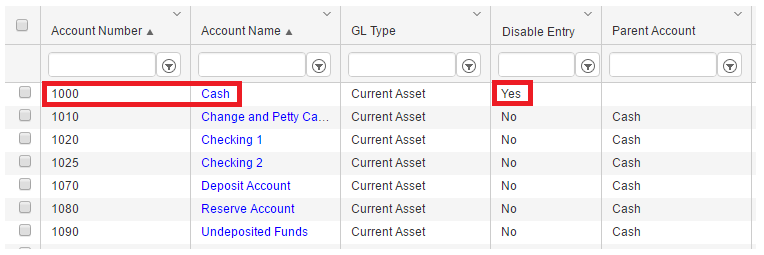
If a GL Account is going to be a true Summary Account, we can Disable Entry for the account. The values in the account going forward will only be a sum of the Child Accounts that are associated with the Parent (disabled) Account.
For accounts that have Disable Entry enabled, the Account Name / Number will no longer show up in any Account Selector dropdowns in the system. The Account will be disabled for direct entry for all transactions (this includes importing Journal Entriesthat post directly to this Account).
This is accomplished on the GL Account Recordvia a Check/Unchecked setting on the Account and can be changed as needed. The only values that would post (in a summary fashion) to this account would then be from the Child Account(s) that identified the Account in question as their respective Parent Account.
To more fully demonstrate ‘Disable Entry’, please see an example below:
Disable Entry Example
Account #1000 has the box ‘Disable Entry (subtotal only)’ checked on the GL Account Record
On an AP Invoice when the user selects the GL Account that will be used on the Transaction line item, Account #1000 is skipped over (#1010 is listed first) and does not appear in the Account Selector dropdown. The Disable Entry account will not appear in any selectors from Transactions throughout the system.
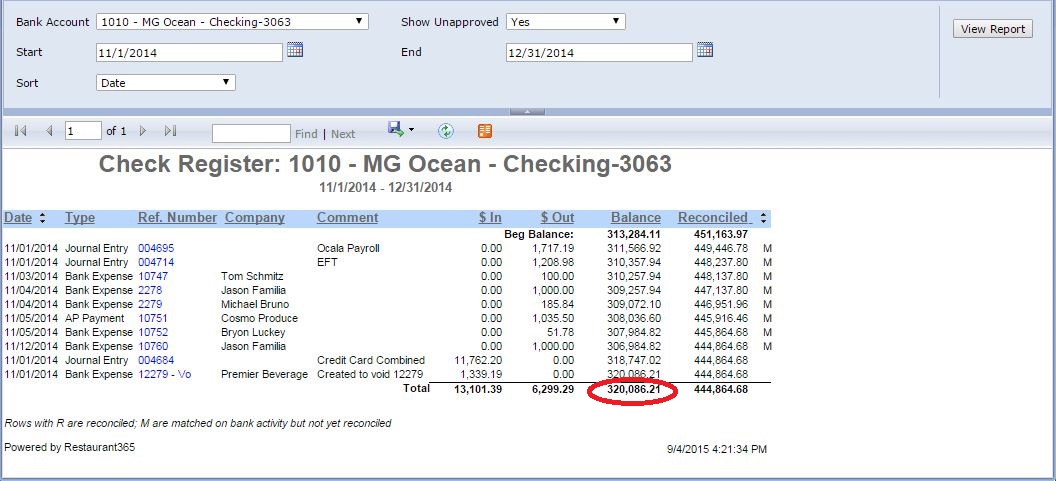
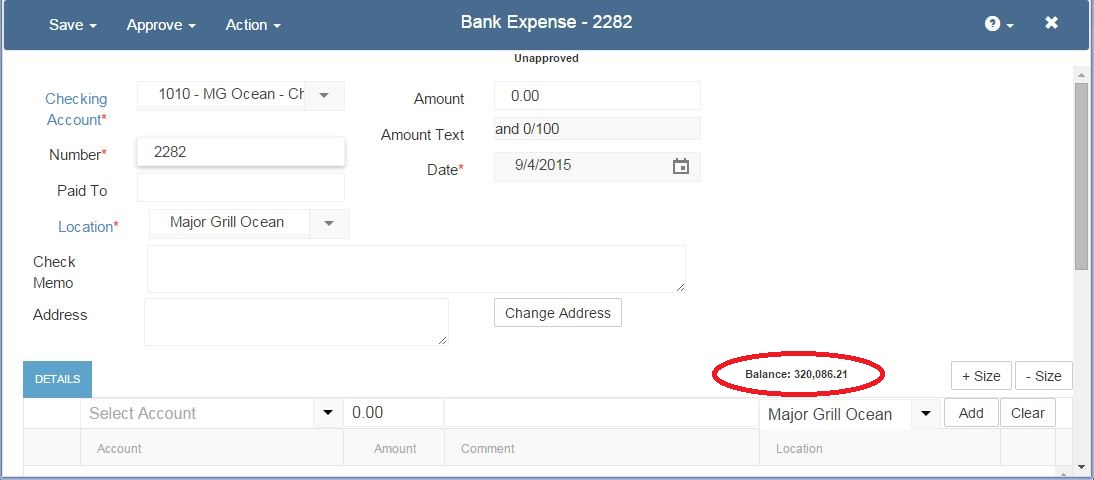
You can see your bank account balances in a few different places in Restaurant365.
1. GL Account Detail Report
2. Check Register Report
3. On Bank Transaction screens
1. In ‘My Reports’, under Financials, there is a GL Account Detail report. Here you can see deatils and the balance as of the date the report is run for.Image may be NSFW. Clik here to view.2. In ‘My Reports’, under Banking, there is a Checkbook Register report. Here you can see the recent detail and current balance.Then run the Check Register ReportImage may be NSFW. Clik here to view.
3. When you open an new bank transaction (Withdrawal, Transfer, Deposit), the current balance is shown on the screen.Image may be NSFW. Clik here to view.
That covers the basics of ‘Where Can I See My Bank Account Balance’. Thank you for attending this training session. This article is one of many training sessions available to you on-demand. We invite you to continue your training so that you can get the most out of Restaurant365 to help your restaurant reach it’s full potential.
Positive Pay Exports can be produced on the Check Run. In order to produce the Positive Pay Export file, the Positive Pay Report must first be assigned on the Bank Record. Click here for information on ACH Reports
Type in the name of the Positive Pay Report in to the Positive Pay Report field
In the following table are the current Positive Pay Report names, along with a sample export file for each Report. Each of these output files were produced on 10/14/16 using the following sample data:
Vendor Name: Generic Vendor
Payment Date: 10/14/16
Checking Account: 1015 – Checking 1
Location:Generic Location
Next Check Number:3029
Total Check Run (1 check): $600.00
Vendor Bank Account / Routing Numbers:123456789 / 987654321